各种排行榜出炉:Java 稳坐冠军宝座、Oracle 岌岌可危,我们的大 PHP 呢

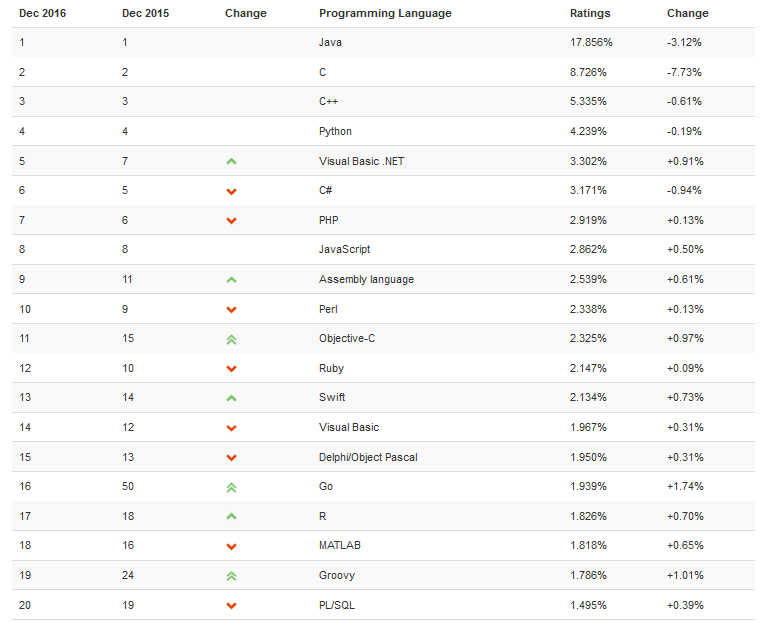
2016年只剩下不到一个月的时间了, IT 界最重要的莫过于各种排行榜,除了加班最狠、待遇最好、妹子最多……的 IT 公司外,程序员们最关心的是不是各种编程语言、数据库的排行榜里,PHP 是最好的编程语言还是最好的“数据库”?

C 语言自 2015 年 11 月以来就有下降趋势。在今年之前的整个 15 年的时间内,其评分都在 15%-20% 之间波动,但今年却一反常态,评分跌至 10% 以下,并且没有看到回升的势头。C 语言到底发生了什么?为何一蹶不振?

看来 Java 坐稳 2017 年热门编程语言排行榜冠军宝座了,你的语言上榜没?冠军总是比较忙,这会正和 Kotlin 比编译速度,到底谁更快呢~

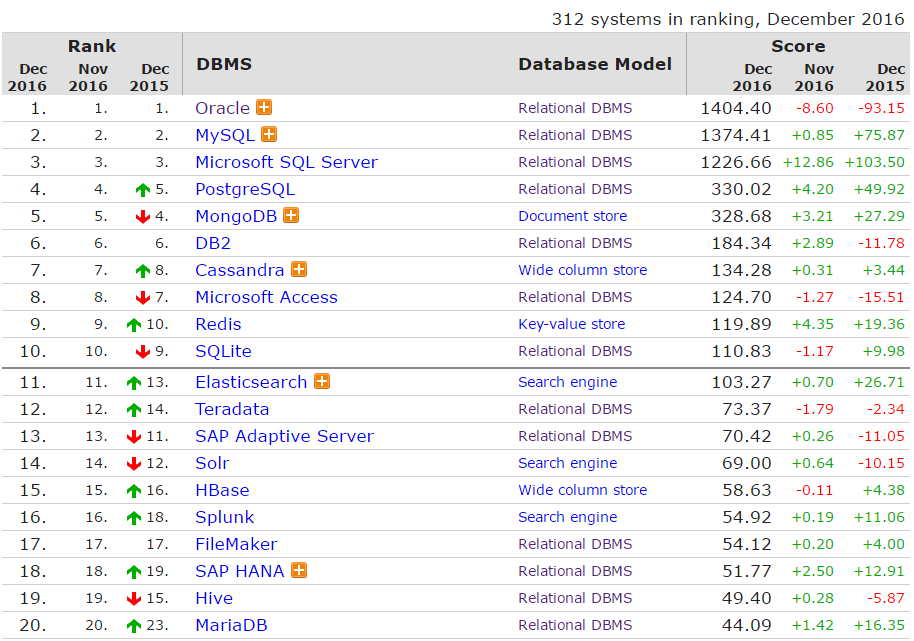
除了编程语言,2016 年全球数据库排名也尘埃落定,Oracle 、MySQL 和 Microsoft SQL Server 依然稳坐三甲宝座,不过,Oracle 的地位可就没那么稳固了,跟第二名 MySQL 的差距已缩小至 30 分!看来明年的排行榜有看头了,不知道是@美国网友:”php是世界上最好的数据库“,还是@凡行:“MySQL是世界上最好的编程语言!”说得对呢~@达尔文:”前排出售小板凳。”

同样地位不保的还有第三方 Android 系统 CM 之父,被踢出局的他与乔布斯经历了同样的悲惨境遇,作为 Cyanogen 公司的主要创始人,Steve Kondik 已经从这家公司离职。

这种感觉就像 Firebug 在其官方网站上宣布 —— “Firebug 扩展不再进行开发或维护,我们邀请您使用 Firefox 的内置开发工具以代替”。@世尘悉洞 :“回想起用firebug的岁月,挺伤感的。感谢一路陪伴,虽然现在不怎么使用了,但是还是很感谢之前的陪伴。”讲不出的再见~

虽然开发者的世界少了 Firebug,不过我们的大谷歌回归啦,Google Developers 中国网站正式发布!Google Developers 中国网站是特别为中国开发者而建立的,它汇集了 Google 为全球开发者所提供的开发技术资源,包括 API 文档、开发案例、技术培训的视频。并涵盖了以下关键开发技术和平台产品的信息:

  • Android(developer.android.google.cn)
  • Tensor Flow (www.tensorflow.org)
  • Google Play(developer.android.com/distribute/googleplay/index.html)
  • AdMob(firebase.google.cn/docs/admob)、
  • Firebase(firebase.google.cn)

除了面向中国开发者的 Google Developers 中国网站,谷歌 DeepMind 还面向公众和开发者开放开源 AI 训练平台 DeepMind Lab,这款软件本周在GitHub上线,它看起来像一款卡通视频游戏,但却是精心设计的,目的是让AI开发者对他们机器人的学习加以控制。

当越来越牛逼的机器人取代程序员写代码,会发生什么呢?过去,程序员需要在大学或工作中花费好几年时间才能学习掌握一些编程知识,熟悉了解一些昂贵的服务器性能,而现在,只需几周时间就能搞定一项网页开发编程语言了。基于人工智能生成的代码,为整个行业带来了颠覆创新。

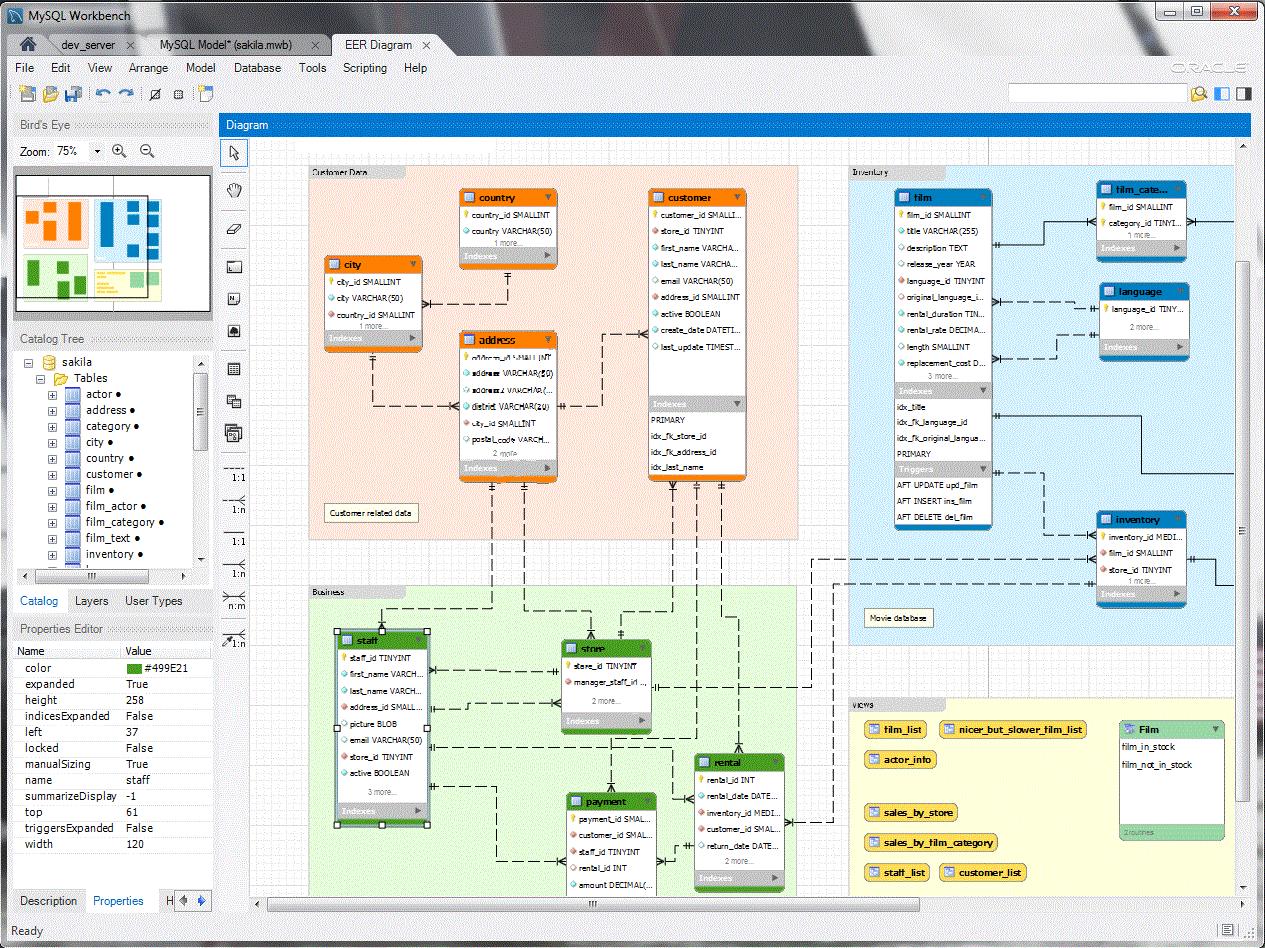
免费好用的MySQL数据库客户端图形界面管理工具

1. Workbench
MySQL Workbench — 可视化数据库设计
MySQLWorkbench 是一款可视化的数据库设计工具,它将SQL开发、管理和数据库设计、创建和维护融合到一个简单的开发环境中,它源自fabFORCE.net,是 DBDesigner4的接班人,并且更换了mysql GUI工具绑定。当前的版本是5.2,最开始的版本是5.0, 需要强调的 是,MySQLWorkbench是被视为DBDesinger 4的继承者来开发的。

下载地址:http://dev.mysql.com/downloads/workbench/

2. HeidiSQL

ConnectionHeidiSQL 之前被称为mySQL-Front,是由德国程序员AnsgarBecker和一些在Delhi领域有突出贡献的人开发的一款免费的开源客户端。用 HeidiSQL管理数据库,用户必须通过验证登录一个本地或者远程的MySQL服务器,创建一个会话(session). 在这个会话里,用户可以通过 连接MySQL服务器管理MySQL 数据库,会话结束会断开与服务器的连接。它的特征集对于大部分普通和高级的数据库,表和数据操作来说已经足够了,但 是为了让它趋向完美,它依然保持积极的开发状态。

一个由Java, jHeidi编写的版本,被设计用来工作在Mac和Linux电脑上,不幸的是,这个项目在2010年三月被叫停了。

官方网站:http://www.heidisql.com/

3.phpMyAdmin10-best-mysql-gui-tools5

PhpMyAdmin是由PHP编写的,目的在于通过Internet管理MySQL,PhpMyAdmin支持对MySQL的大范围的操作,最频繁的使用是数据库的管理、表格、字段、关系、索引、用户、权限。你也可以直接执行SQL语句。

官方网站:http://www.phpmyadmin.net/home_page/

4. Sequel Pro

10-best-mysql-gui-tools6Sequel Pro是一款免费的开源项目,它是CocoaMySQL 数据库管理系统的继承者, CocoaMySQL是LorenzTextor脑力劳动的产物, 而Lorenz Textor是从2003年开始,CocoaMySQL主要的开发者。

SequelPro用来管理MySQL数据库(本地或者internet),它允许你增加、删除数据库和表,更改字段、索引和视图,过滤table内容,增加、编辑和删除列,执行自定义查询和转存table和整个数据库
它兼容MySQL 3.x, 4 or 5.

官方网站:http://www.sequelpro.com/

5. MySQL Browser

MySQLBrowser的优点是简单,极其简单,安装之后能够立刻上手,马上就能使用的那种,布局也很简陋,功能也很简陋,简单使用没有问题,尤其是刚开始学习mysql的童鞋,可以尝试一下。

官方下载地址: http://dev.mysql.com/downloads/gui-tools/5.0.html

MySQL的Grant命令

来源:http://yingxiong.javaeye.com/blog/451208

本文实例,运行于 MySQL 5.0 及以上版本。

MySQL 赋予用户权限命令的简单格式可概括为:

grant 权限 on 数据库对象 to 用户

一、grant 普通数据用户,查询、插入、更新、删除 数据库中所有表数据的权利。

grant select on testdb.* to common_user@’%’
grant insert on testdb.* to common_user@’%’
grant update on testdb.* to common_user@’%’
grant delete on testdb.* to common_user@’%’

或者,用一条 MySQL 命令来替代:

grant select, insert, update, delete on testdb.* to common_user@’%’

二、grant 数据库开发人员,创建表、索引、视图、存储过程、函数。。。等权限。

grant 创建、修改、删除 MySQL 数据表结构权限。

grant create on testdb.* to developer@’192.168.0.%’;
grant alter on testdb.* to developer@’192.168.0.%’;
grant drop on testdb.* to developer@’192.168.0.%’;

grant 操作 MySQL 外键权限。

grant references on testdb.* to developer@’192.168.0.%’;

grant 操作 MySQL 临时表权限。

grant create temporary tables on testdb.* to developer@’192.168.0.%’;

grant 操作 MySQL 索引权限。

grant index on testdb.* to developer@’192.168.0.%’;

grant 操作 MySQL 视图、查看视图源代码 权限。

grant create view on testdb.* to developer@’192.168.0.%’;
grant show view on testdb.* to developer@’192.168.0.%’;

grant 操作 MySQL 存储过程、函数 权限。

grant create routine on testdb.* to developer@’192.168.0.%’; — now, can show procedure status
grant alter routine on testdb.* to developer@’192.168.0.%’; — now, you can drop a procedure
grant execute on testdb.* to developer@’192.168.0.%’;

三、grant 普通 DBA 管理某个 MySQL 数据库的权限。

grant all privileges on testdb to dba@’localhost’

其中,关键字 “privileges” 可以省略。
四、grant 高级 DBA 管理 MySQL 中所有数据库的权限。

grant all on *.* to dba@’localhost’

五、MySQL grant 权限,分别可以作用在多个层次上。

1. grant 作用在整个 MySQL 服务器上:

grant select on *.* to dba@localhost; — dba 可以查询 MySQL 中所有数据库中的表。
grant all on *.* to dba@localhost; — dba 可以管理 MySQL 中的所有数据库

2. grant 作用在单个数据库上:

grant select on testdb.* to dba@localhost; — dba 可以查询 testdb 中的表。

3. grant 作用在单个数据表上:

grant select, insert, update, delete on testdb.orders to dba@localhost;

这里在给一个用户授权多张表时,可以多次执行以上语句。例如:

grant select(user_id,username) on smp.users to mo_user@’%’ identified by ‘123345’;
grant select on smp.mo_sms to mo_user@’%’ identified by ‘123345’;

4. grant 作用在表中的列上:

grant select(id, se, rank) on testdb.apache_log to dba@localhost;

5. grant 作用在存储过程、函数上:

grant execute on procedure testdb.pr_add to ‘dba’@’localhost’
grant execute on function testdb.fn_add to ‘dba’@’localhost’

六、查看 MySQL 用户权限

查看当前用户(自己)权限:

show grants;

查看其他 MySQL 用户权限:

show grants for dba@localhost;

七、撤销已经赋予给 MySQL 用户权限的权限。

revoke 跟 grant 的语法差不多,只需要把关键字 “to” 换成 “from” 即可:

grant all on *.* to dba@localhost;
revoke all on *.* from dba@localhost;

八、MySQL grant、revoke 用户权限注意事项

1. grant, revoke 用户权限后,该用户只有重新连接 MySQL 数据库,权限才能生效。

2. 如果想让授权的用户,也可以将这些权限 grant 给其他用户,需要选项 “grant option“

grant select on testdb.* to dba@localhost with grant option;

这个特性一般用不到。实际中,数据库权限最好由 DBA 来统一管理。

遇到 SELECT command denied to user ‘用户名’@’主机名’ for table ‘表名’ 这种错误,解决方法是需要把吧后面的表名授权,即是要你授权核心数据库也要。

我遇到的是SELECT command denied to user ‘my’@’%’ for table ‘proc’,是调用存储过程的时候出现,原以为只要把指定的数据库授权就行了,什么存储过程、函数等都不用再管了,谁知道也要把数据库mysql的 proc表授权

mysql授权表共有5个表:user、db、host、tables_priv和columns_priv。

授权表的内容有如下用途:
user表
user表列出可以连接服务器的用户及其口令,并且它指定他们有哪种全局(超级用户)权限。在user表启用的任何权限均是全局权限,并适用于所有数据库。例如,如果你启用了DELETE权限,在这里列出的用户可以从任何表中删除记录,所以在你这样做之前要认真考虑。

db表
db表列出数据库,而用户有权限访问它们。在这里指定的权限适用于一个数据库中的所有表。

host表
host表与db表结合使用在一个较好层次上控制特定主机对数据库的访问权限,这可能比单独使用db好些。这个表不受GRANT和REVOKE语句的影响,所以,你可能发觉你根本不是用它。

tables_priv表
tables_priv表指定表级权限,在这里指定的一个权限适用于一个表的所有列。

columns_priv表
columns_priv表指定列级权限。这里指定的权限适用于一个表的特定列。

How to set up mysql master/slave architecture.

来源:【原创】How to set up mysql master/slave architecture. (2008-12-10 09:55)

All the info below should be added in /etc/my.cnf. If you can’t find this file, just use the following statements to find where it is.

  1. To find the location of my.cnf.

ps aux | grep mysql | grep -v ‘grep’ | head -n 1

For example .

[root@localhost ~]# ps aux | grep mysql | grep -v ‘grep’ | head -n 1

root      2952  0.0  0.2   4512  1220 ?        S    16:12   0:00 /bin/sh ./mysqld_safe –defaults-file=/usr/local/mysql/my.cnf

Then we know the correct configuration file is /usr/local/mysql/my.cnf.

We should add the following lines to my.cnf in section [mysqld].

server-id = 1

log-bin=mysql-bin

binlog-do-db=db1

binlog-do-db=db2

binlog-ignore-db=ignore-db1

binlog-ignore-db=ignore-db2

expire_logs_days = 5

max_binlog_size=500M

log-slave-updates

Then restart mysqld manually and execute the following statements in mysql command line client.

  1. To grant valid user to slave.

To assume this thread called A.

grant file,replication slave on *.* to ‘mysql_ms’@’Slave IP’ identified by ‘Your password’;

flush privileges;

For example, if my slave’s ip address is "192.168.4.55". The user is "mysql_ms" and his password is "123456".

mysql> grant replication slave,file on *.* to ‘mysql_ms’@’192.168.4.55’ identified by ‘123456’;

Query OK, 0 rows affected (0.00 sec)

mysql> flush privileges;

Query OK, 0 rows affected (0.00 sec)

Be sure to send the username and password to me.

  1. Lock tables and get the master’s binary log file and position.

flush tables with read lock;

show master status\G

You must not quit the current mysql command line client.

mysql> show master status\G

*************************** 1. row ***************************

            File: mysql-bin.000004

        Position: 595

Binlog_Do_DB: test

Binlog_Ignore_DB: mysql

1 row in set (0.00 sec)

mysql>

Then send the results to me.

  1. Backup exact database.

Now we locked all the tables and got the exact binary log file and position in the previous step. So begin to backup the exact database right now.

Use mysqldump to dump the necessary data to flat file, then use tool named gzip or gzip2 to compress it.

For example, if your database name is db1 and your mysql installation path was added in the environment variable named "PATH".

Use the following statement to backup your databases’ data.

mysqldump -uroot -p –net_buffer_length=10M –max_allowed_packet=11M db1 > db1.txt

Here is my example in my machine, my database name is test.

[root@localhost ~]# /usr/local/mysql/bin/mysqldump -uroot -p –net_buffer_length=100M –max_allowed_packet=120M test > test.txt

To compress the flat text file to a gzip file, using the following command.

gzip db1.txt

Then the compressed file named db1.txt.gz will be generated. You should send this file to me.

After all the above completes, go to thread A and execute the following command.

unlock tables.

Then quit thread A.

  1. What the slave machine want.

User name and password.

Master’s IP address.(192.168.4.54)

Master’s  mysql port.(3308)

Master’s  mysql binary log file and position

Master’s backup data.

  1. The following is the slave configuration.

Add the my.cnf on slave machine and restart mysqld.

[mysqld]

server-id = 2

replicate-do-db=db1

replicate-do-db=db2

replicate-ignore-db=ignore-db1

replicate-ignore-db=ignore-db2

log-bin=slave-bin

  1. Get the master information on slave machine.

Then exit from it and use the following command to import from the backup file in the shell environment.

gzip gb1.txt.gz

mysql –uroot –p –S/tmp/mysql3307.sock < gb1.txt

Enter the mysql command line client.

set @@global.max_allowed_packet=11*1024*1024;

Then exit it and enter it again.

Change master to

master_host=’192.168.4.54’,

master_port=3308,

master_user=’mysql_ms’,

master_password=’123456’

master_log_file=’mysql-bin.000004’,

master_log_pos=595;

start slave;
MySQL:讨人喜欢的 MySQL replace into 用法(insert into 的增强版)

讨人喜欢的 MySQL replace into 用法(insert into 的增强版)

在向表中插入数据的时候,经常遇到这样的情况:1. 首先判断数据是否存在; 2. 如果不存在,则插入;3.如果存在,则更新。

在 SQL Server 中可以这样处理:

 if not exists (select 1 from t where id = 1) insert into t(id, update_time) values(1, getdate()) else update t set update_time = getdate() where id = 1

那么 MySQL 中如何实现这样的逻辑呢?别着急!MySQL 中有更简单的方法: replace into

replace into t(id, update_time) values(1, now());

replace into t(id, update_time) select 1, now();

replace into 跟 insert 功能类似,不同点在于:replace into 首先尝试插入数据到表中,

1. 如果发现表中已经有此行数据(根据主键或者唯一索引判断)则先删除此行数据,然后插入新的数据。

2. 否则,直接插入新数据。

要注意的是:插入数据的表必须有主键或者是唯一索引!否则的话,replace into 会直接插入数据,这将导致表中出现重复的数据。

MySQL replace into 有三种形式:

1. replace into tbl_name(col_name, ...) values(...) 
2. replace into tbl_name(col_name, ...) select ... 
3. replace into tbl_name set col_name=value, ...

前两种形式用的多些。其中 “into” 关键字可以省略,不过最好加上 “into”,这样意思更加直观。另外,对于那些没有给予值的列,MySQL 将自动为这些列赋上默认值。