国标35114(GB35114)

国标35114,和国标28181基本一致, 可以归纳为28181的扩展,GB35114主要依赖加密机(签名验签服务器、密钥管理服务器、USBKey)这三种设备;

签名SM2,

按照国密的规范,SM2签名结果r||s长度应该是(r:32字节)+(s:32字节)64字节,部分算法加个04头字节,也是65个字节。一般网络上可以直接转 HEX16进制使用;

有些平台要求base64加密数据,如源签名长度96/4*3=72字节。

SM2签名结果长度为64字节,为什么出来的是72字节?这里可能使用硬加密,再把 byte[]转码后base64。

其实,SM2签名结果数据是要经过asn.1(der格式)编码,编码结果长度在70-72变化。

使用反向ssh从外网访问内网主机的方法详解

由于我们自己使用的电脑未必有外网ip,因此我们需要一个有固定外网ip的服务器(随便搞个腾讯云,阿里云的小机子就行),然后用这台服务器与内网的机子进行通信,我们到时候要先登陆自己的服务器,然后再利用这个服务器去访问内网的主机。
1、准备好有固定ip的服务器A,以及待访问的内网机器B。两者都开着sshd服务,端口号默认都是22。顺便做好ssh免密码登陆。
2、内网主机B主动连接服务器A,执行以下命令:
 >$ ssh -NfR 10000:localhost:22 username@servername -p 22
这条命令的意思是在后台执行(-f),不实际连接而是做port forwarding(-N),做反向ssh(-R),将远程服务器的10000端口映射成连接本机(B)与该服务器的反向ssh的端口。
附:这里有必要加强一下记忆,这个端口号一不小心就容易搞混

man文档中的参数命令是这样的:

-R [bind_address:]port:host:hostport
-R [bind_address:]port:local_socket
-R remote_socket:host:hostport
-R remote_socket:local_socket

bind_address以及其后面的port是指远程主机的ip以及端口,host以及其后的hostport是指本机的ip和端口。由于ssh命令本身需要远程主机的ip(上上条命令中的servername),因此这个bind_address原则上是可以省略的。
执行完这条命令,我们可以在服务器A上看到他的10000端口已经开始监听:
~]$ ss -ant | grep 10000
LISTEN 0 128 127.0.0.1:10000 *:*
3、在上面的操作中,这个1111端口就已经映射成了内网主机B的22端口了,现在我们只要ssh到自己的这个端口就行了。在服务器A中执行:
 >$ ssh username@localhost -p 10000
这样就成功的登陆了内网的主机了。
功能优化
上面的做法其实有一个问题,就是反向ssh可能会不稳定,主机B对服务器A的端口映射可能会断掉,那么这时候就需要主机B重新链接,而显然远在外地的我无法登陆B

这其实有一个非常简单的解决方案,就是用autossh替代步骤2中的ssh:
C:\ > autossh -M 2222 -NfR 10000:localhost:22 username@servername -p 22
后面的参数跟ssh都一样,只是多了一个-M参数,这个参数的意思就是用本机的2222端口来监听ssh,每当他断了就重新把他连起来。。。不过man文档中也说了,这个端口又叫echo port,他其实是有一对端口的形式出现,第二个端口就是这个端口号加一。因此我们要保证这个端口号和这个端口号加一的端口号不被占用。

有时,我们会想在局域网外访问局域网内的机器。这时,我们可以使用SSH的反向连接来实现。
设备A:位于局域网内,可以访问代理服务器B。 假设该设备IP:A.A.A.A,用户名userA
设备B:位于局域网外,作为访问设备A的代理服务器,不可访问A。假设该设备IP:B.B.B.B,用户名userB
设备C:想要访问A的设备,可以访问B,无法直接访问A。假设该设备IP:C.C.C.C,用户名userC

目标:设备C可以通过SSH访问局域网内设备C

条件:三台设备都需要包含SSH客户端,A,B设备需要包含SSH服务端。

在A设备上建立A设备到B设备的反向代理:

ssh -fCNR <port_b1>:localhost:22 userB@B.B.B.B

例如:ssh -fCNR 10000:localhost:22 userB@B.B.B.B (此时B设备上已经可以通过ssh -p 10000 userA@localhost连接到设备A)

<port_b1>:建立在B机器上,用来代理设备A机器22端口的端口。

userB@B.B.B.B :B机器的用户名和IP地址。

在B设备上建立B设备到A设备的正向代理:(这样做的目的是为了实现和外网的通信)

ssh -fCNL *:<port_b2>:localhost:<port_b1> userB@localhost

例如:ssh -fCNL *:10001:localhost:10000 userB@localhost

<port_b2>:用作本地转发的端口,用来和外网通信,并将数据转发到<port_b1>,实现从其他机器可以访问。

*代表可以接受来自任意机器的访问。

现在C机器上可以通过B机器SSH到A机器

ssh -p<port_b2> userA@B.B.B.B

参数介绍

-f 后台运行-C 允许压缩数据-N 不执行任何命令-R 将端口绑定到远程服务器,反向代理-L 将端口绑定到本地客户端,正向代理

卡巴斯基悲催:美国全力封杀全球第一杀软

虽然在AV-TEST最新杀软评测中,卡巴斯基得到了满分成为第一,但美国依然不允许它出现在政府采购名录中,而这个封杀的事态还在加剧。

据外媒CNET报道称,除了美国的政府机构外,FBI也在悄悄暗示那些私营机构停止使用卡巴斯基,情况十分严重。

报道中提到,能源行业以及使用工业控制系统等企业,都在被警告的名单中,而按照美国的意思,就是先让该国企业尽可能快的从其系统中移除卡巴斯基。

虽然卡巴严正否认自己进行涉嫌收集不法信息的“间谍”活动,甚至可以交出软件源代码,但目前的情况是,这丝毫没有打动当局控制者,而消息中还透露,俄罗斯也正努力移除美国科技公司如微软的操作系统。

对于微软来说,这件事他们暗地里非常开心,因为这样可以让更多的用户来换用Windows Defender,尤其是随着创意者更新全面升级的“新安全中心”。

来自:驱动之家

转自:https://www.oschina.net/news/87919/kaspersky-banned-by-american-government

苹果下架中国区主流VPN应用

苹果下架中国区主流VPN应用

雷锋网(公众号:雷锋网)消息,根据纽约时报的报道,苹果下架了中国区App Store的一些主流VPN应用。

据报道,一些公司收到了来自苹果的通知,称他们的APP已从中国区应用市场下架。

一个名为ExpressVPN的应用在其博客上称,苹果给出的解释是产品违反了中国法律,应用中包含一些非法的内容。这家公司还称,他们发现所有的主流iOS端VPN应用都被下架了。

苹果下架中国区主流VPN应用

ExpressVPN收到的通知

另一家名为Star VPN的应用也称收到了同样的通知。

雷锋网以VPN为关键词搜索中国区苹果商店,发现还是有很多应用可以下载。不过上述两家的应用确实搜不到。

之前有消息称,明年2月国内会停止所有VPN服务,不过后来工信部称,规范对象主要是未经电信主管部门批准,无国际通信业务经营资质企业和个人。

苹果越来越重视中国市场。不久前雷锋网报道,苹果将在贵州建其在中国的首个数据中心。另外,一个多星期前,苹果还宣布任命原苹果无线技术副总裁葛越女士担任大中华区董事总经理,全面负责中国的业务和团队,而且这一职位为新设立的。

雷锋网原创文章,未经授权禁止转载。详情见转载须知

来源:https://www.leiphone.com/news/201707/nB4mZxwvxz3iYaPy.html

此地址使用了一个通常用于网络浏览以外的端口。出于安全原因,Firefox 取消了该请求

此地址使用了一个通常用于网络浏览以外的端口。出于安全原因,Firefox 取消了该请求

FirFox打开80以外的端口,会弹出以下提示:

“此地址使用了一个通常用于网络浏览以外的端口。出于安全原因,Firefox 取消了该请求。”。

其实是使用了不安全的端口,解决方法如下:

1.在Firefox地址栏输入about:config

2.在右键新建一个字符串键 network.security.ports.banned.override

将需访问网站的端口号添加到,值就是那个端口号即可。
如有多个,就半角逗号隔开,例:81,88,98

在能保证安全的前提下,还简化成这样写1025-65535。

这样,就可以浏览指定范围任意端口的网站了。

chrome 参考:http://my.liyunde.com/chrome-err_unsafe_port/

chrome 谷歌浏览器出现 错误代码:ERR_UNSAFE_PORT 的解决办法

1、问题描述:

使用谷歌浏览器访问一个WEB项目,该项目设置的端口号为6000,结果不能访问:
 
2、问题所在:
出现此类问题的原因不是服务器端的问题,而是谷歌浏览器(FF浏览器也有)对一些特殊的端口进行了限制,具体有哪些端口进行了访问限制,请参见本文末。
 
3、问题解决:
最简单的办法就是直接修改搭建项目的端口号,避开这些谷歌限制的端口号。
 
谷歌浏览器限制的一些端口号:
1:    // tcpmux
7:    // echo
9:    // discard
11:   // systat
13:   // daytime
15:   // netstat
17:   // qotd
19:   // chargen
20:   // ftp data
21:   // ftp access
22:   // ssh
23:   // telnet
25:   // smtp
37:   // time
42:   // name
43:   // nicname
53:   // domain
77:   // priv-rjs
79:   // finger
87:   // ttylink
95:   // supdup
101:  // hostriame
102:  // iso-tsap
103:  // gppitnp
104:  // acr-nema
109:  // pop2
110:  // pop3
111:  // sunrpc
113:  // auth
115:  // sftp
117:  // uucp-path
119:  // nntp
123:  // NTP
135:  // loc-srv /epmap
139:  // netbios
143:  // imap2
179:  // BGP
389:  // ldap
465:  // smtp+ssl
512:  // print / exec
513:  // login
514:  // shell
515:  // printer
526:  // tempo
530:  // courier
531:  // chat
532:  // netnews
540:  // uucp
556:  // remotefs
563:  // nntp+ssl
587:  // stmp?
601:  // ??
636:  // ldap+ssl
993:  // ldap+ssl
995:  // pop3+ssl
2049: // nfs
3659: // apple-sasl / PasswordServer
4045: // lockd
6000: // X11
6665: // Alternate IRC [Apple addition]
6666: // Alternate IRC [Apple addition]
6667: // Standard IRC [Apple addition]
6668: // Alternate IRC [Apple addition]
6669: // Alternate IRC [Apple addition]

Linux Kernel 3.18 LTS 终止支持 请升至 4.9 或 4.4 分支

在发布最后一个维护版本更新之后,Linux 稳定版内核维护者 Greg Kroah-Hartman 宣布 Linux Kernel 3.18 分支走到了生命的尽头。而 3.18 LTS 原计划于今年 1 月终止支持。

Linux Kernel 3.18.48 LTS 是该分支的最后版本,根据短日志显示该版本共计调整了 50 个文件,插入 159 处删除 351 处。升级网络堆栈的同时改善了 Bluetooth, Bridge, IPv4, IPv6, CAIF 和 Netfilter,并升级了 USB, SCSI, ATA, media, GPU, ATM, HID, MTD, SPI 和网络(有线和无线)驱动。新发布的 3.18.48 还修正了 3.18.47 和 3.18.27 中的一个 bug。

LTS 版通常会提供大约两年的支持时间,3.18 是在 2014 年 12 月发布的。如果你当前还在使用该内核分支,那么现在你应该升级至更新的 LTS 版本,例如 Linux Kernel 4.9 或者 4.4,这两个版本要比 3.18 更加的安全和强悍。不过 Linux Kernel 3.18 主要被 Google 和其他供应商应用于一些 Android 设备、部分 Chromebook 上,Kroah-Hartman 建议用户拒绝购买仍然使用 3.18 LTS 的供应商的设备。如果无法升级内核开发者也提供了一些建议。

“如果你在使用 Linux Kernel 3.18 中有困难,那么我可以给你提供一些帮助。首先,你需要和硬件供应商反馈,要求尽快升级否则不再购买他们的产品。如果供应商还是不升级,请致信我们让我们出面和厂商进行沟通,出现这个问题的肯定不止你一个人。”

来源:http://www.oschina.net/news/81799/linux-kernel-3-18-48-released

Adding SQLCipher to Xcode Projects IOS MAC

Adding SQLCipher to Xcode Projects

SQLite is already a popular API for persistent data storage in iOS apps so the upside for development is obvious. As a programmer you work with a stable, well-documented API that happens to have many good wrappers available in Objective-C, such as FMDB and Encrypted Core Data. All security concerns are cleanly decoupled from application code and managed by the underlying framework.

The framework code of the SQLCipher project is open source, so users can be confident that an application isn’t using insecure or proprietary security code. In addition, SQLCipher can also be compiled on Android, Linux, OS X and Windows for those developing cross-platform applications.

Using SQLCipher in an iOS app is fairly straightforward. This document describes integrating SQLCipher into an existing iOS project using the Community Edition source code build process. This tutorial assumes some familiarity with basic iOS app development and a working install of Xcode (6.1.1). The same basic steps can be applied to OS X projects as well.

? Hot Tip: Commercial Edition static libraries are available for you to drop right into your project if you’d like to skip all this and receive personalized support from our crack development team! Binaries and helpful projects integrations are available for all supported platforms. Learn more »

Prerequisites

Xcode with an iOS or OS X SDK installed. Visit the Apple Developer site for more information on downloading the latest Xcode and iOS and OS X SDKs.

OpenSSL

OpenSSL is no longer required for building SQLCipher on iOS and OS X, as the project by default uses Apple’s CommonCrypto framework for hardware-accelerated encryption. You can still build SQLCipher with other crypto providers like OpenSSL if you’d prefer, or you can write your own.

SQLCipher

Fire up the Terminal app, switch into your project’s root directory and checkout the SQLCipher project code using Git:

$ cd ~/Documents/code/SQLCipherApp
$ git clone https://github.com/sqlcipher/sqlcipher.git

Xcode Project Configuration

The SQLCipher source provides a sqlcipher.xcodeproj project file that we’ll add to your project to build a static library that you’ll link from your main application target.

Add Project Reference

Open your iOS app’s project or workspace in Xcode, open the Project Navigator (command+1), and click on the top-level Project icon for your iOS app. Right click on the project and choose “Add Files to “My App”” (the label will vary depending on your app’s name). Since we cloned SQLCipher directly into the same folder as your iOS app you should see a sqlcipher folder in your root project folder. Open this folder and select sqlcipher.xcodeproj:
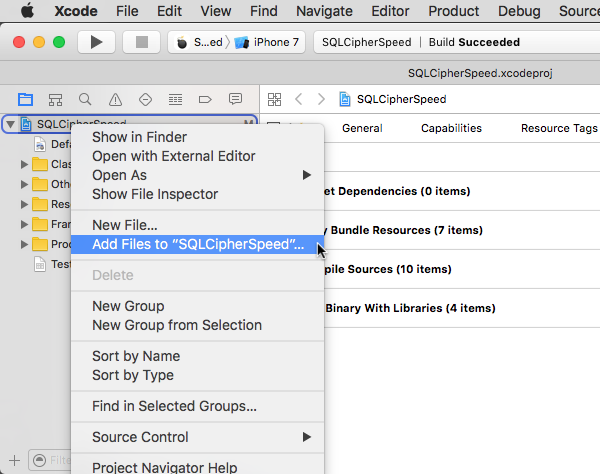
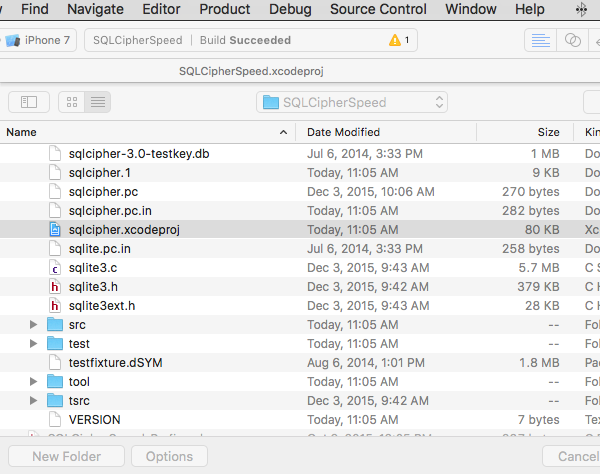
Add Files to 'My App'

Project References

Project Settings

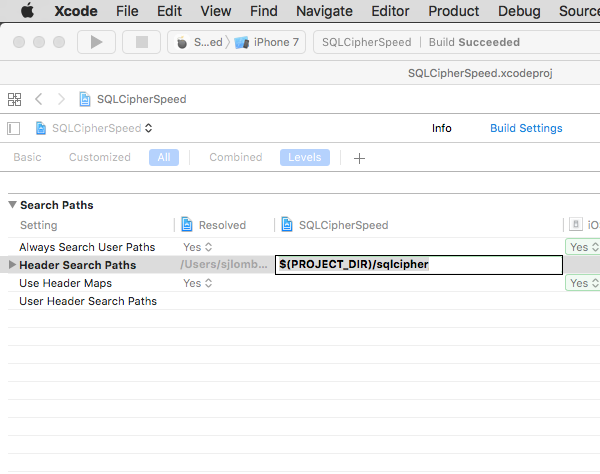
Navigate to your Project settings (make sure you don’t select the application target level). Select the Build Settings pane. In the search field, type in “Header Search Paths”. Double-click on the field under the target column and add the following path: $(PROJECT_DIR)/sqlcipher/src:
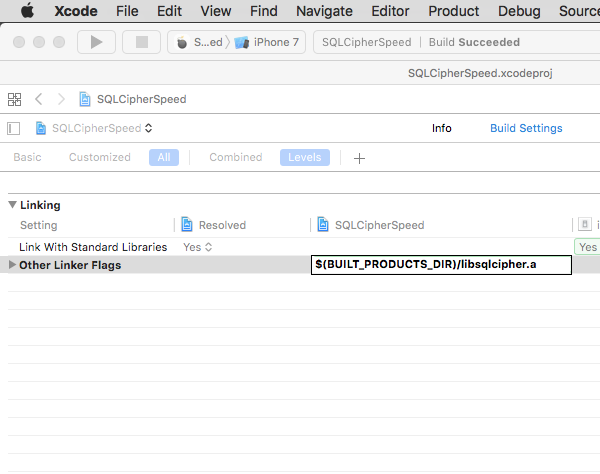
Next, add a setting to ensure that SQLCipher is the first library linked with your application in the “Other Linker Flags” setting. Start typing “Other Linker Flags” into the search field until the setting appears, double click to edit it, and add the following value: $(BUILT_PRODUCTS_DIR)/libsqlcipher.a
You will next edit one other setting on your Project to ensure the SQLCipher builds correctly—”Other C Flags.” Start typing “Other C Flags” into the search field until the setting appears, double click to edit it, and in the pop-up add the following value: -DSQLITE_HAS_CODEC
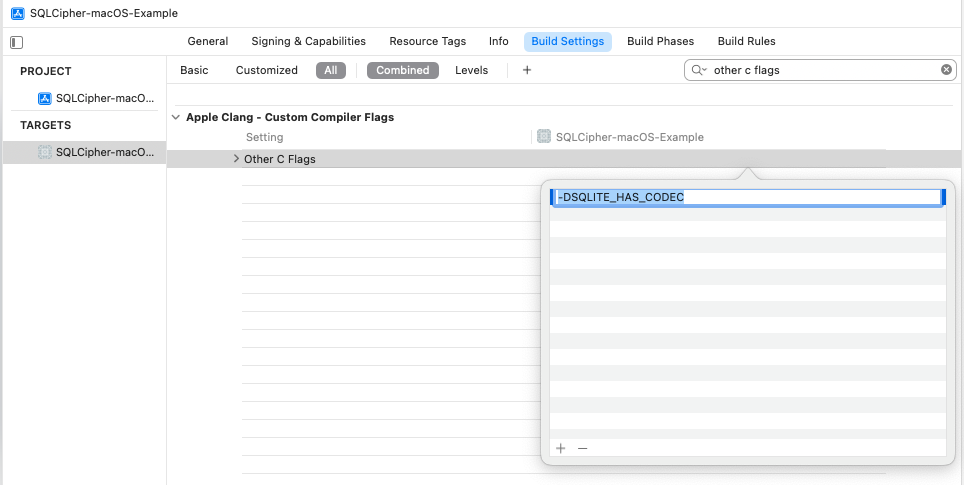
Target Settings

Next, navigate to the Target Level settings. Add a Target dependency to each of your application targets to ensure that SQLCipher is compiled before the application code. In Xcode’s Project Navigator (command+1), select your app’s Project file and in the Editor pane select Build Phases and your app’s main target (not the project file).

Expand Target Dependencies and click on the + button at the end of the list. In the browser that opens, select the sqlcipher static library target:
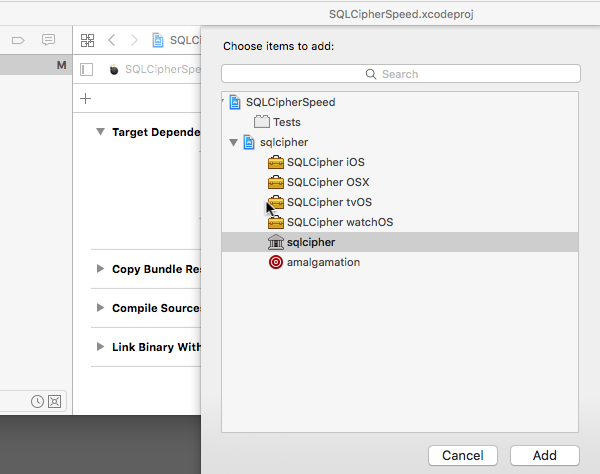
Add Target Dependency

Expand Link Binary With Libraries, click on the +button at the end of the list, and select the libsqlcipher.a library.
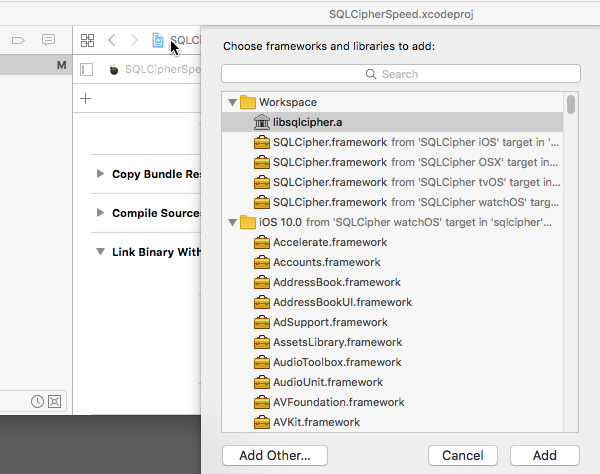
Link Binary With Libraries

Finally, also under Link With Libraries, add Security.framework.
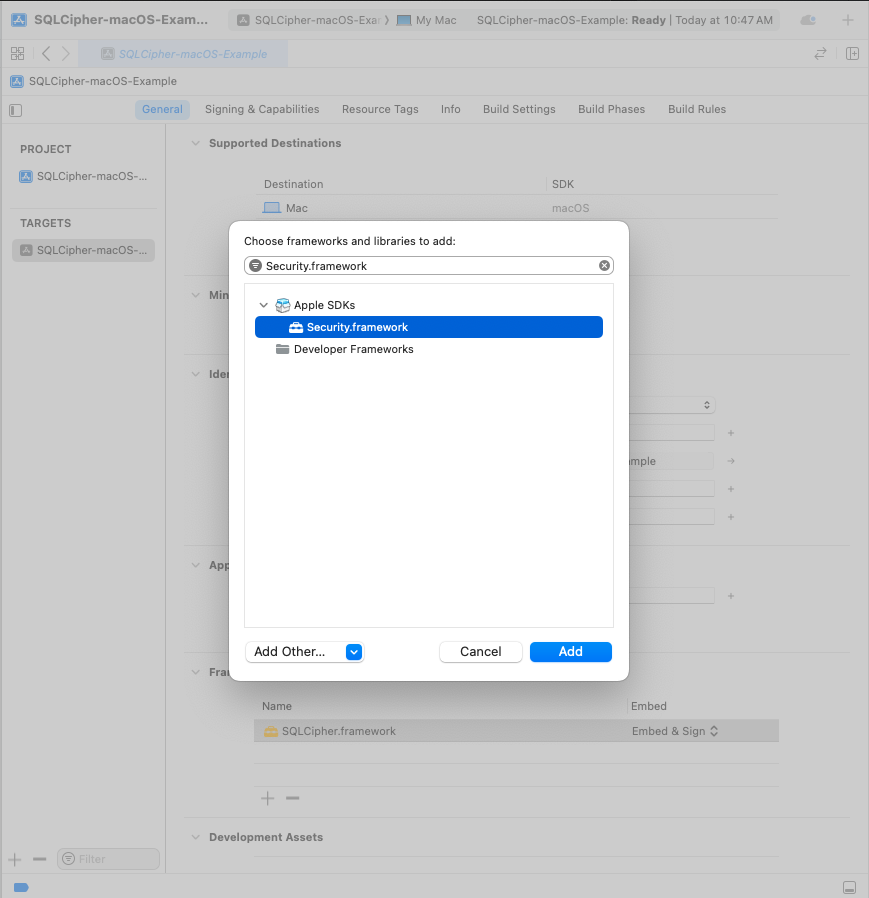
? Hot Tip: If libsqlite3.dylib or another SQLite framework is listed in your Link Binary With Libraries list be sure to remove it!

Repeat these steps for any other targets in your project that will depend on SQLCipher, i.e. unit tests.

Integration Code

Now that the SQLCipher library is incorporated into the project you can start using the library immediately. Telling SQLCipher to encrypt a database is easy:

  • Open the database
  • Use the sqlite3_key function to provide key material. In most cases this should occur as the first operation after opening the database.
  • Run a query to verify the database can be opened (i.e. by querying the schema)
  • As a precautionary measure, run a query to ensure that the application is using SQLCipher on the active connection
#import <sqlite3.h>

...
NSString *databasePath = [[NSSearchPathForDirectoriesInDomains(NSDocumentDirectory, NSUserDomainMask, YES) objectAtIndex:0]
                          stringByAppendingPathComponent: @"sqlcipher.db"];
sqlite3 *db;
bool sqlcipher_valid = NO;

if (sqlite3_open([databasePath UTF8String], &db) == SQLITE_OK) {
    const char* key = [@"BIGSecret" UTF8String];
    sqlite3_key(db, key, strlen(key));
    if (sqlite3_exec(db, (const char*) "SELECT count(*) FROM sqlite_master;", NULL, NULL, NULL) == SQLITE_OK) {
      if(sqlite3_prepare_v2(database, "PRAGMA cipher_version;", -1, &stmt, NULL) == SQLITE_OK) {
        if(sqlite3_step(stmt)== SQLITE_ROW) {
          const unsigned char *ver = sqlite3_column_text(stmt, 0);
          if(ver != NULL) {
            sqlcipher_valid = YES;

            // password is correct (or database initialize), and verified to be using sqlcipher

          }
        }
        sqlite3_finalize(stmt);
      }
    }
    sqlite3_close(db);
}

In most cases SQLCipher uses PBKDF2, a salted and iterated key derivation function, to obtain the encryption key. Alternately, an application can tell SQLCipher to use a specific binary key in blob notation (note that SQLCipher requires exactly 256 bits of key material), i.e.

PRAGMA key = "x'2DD29CA851E7B56E4697B0E1F08507293D761A05CE4D1B628663F411A8086D99'";

Once the key is set SQLCipher will automatically encrypt all data in the database! Note that if you don’t set a key then SQLCipher will operate identically to a standard SQLite database.

Testing and Verification

There are a number of ways that you can verify SQLCipher is working as expected in your applications before its release to users.

After the application is wired up to use SQLCipher, take a peek at the resulting data files to make sure everything is in order. An ordinary SQLite database will look something like the following under hexdump. Note that the file type, schema, and data are clearly readable.

% hexdump -C plaintext.db
00000000  53 51 4c 69 74 65 20 66  6f 72 6d 61 74 20 33 00  |SQLite format 3.|
00000010  04 00 01 01 00 40 20 20  00 00 00 04 00 00 00 00  |.....@  ........|
...
000003b0  00 00 00 00 24 02 06 17  11 11 01 35 74 61 62 6c  |....$......5tabl|
000003c0  65 74 32 74 32 03 43 52  45 41 54 45 20 54 41 42  |et2t2.CREATE TAB|
000003d0  4c 45 20 74 32 28 61 2c  62 29 24 01 06 17 11 11  |LE t2(a,b)$.....|
000003e0  01 35 74 61 62 6c 65 74  31 74 31 02 43 52 45 41  |.5tablet1t1.CREA|
000003f0  54 45 20 54 41 42 4c 45  20 74 31 28 61 2c 62 29  |TE TABLE t1(a,b)|
...
000007d0  00 00 00 14 02 03 01 2d  02 74 77 6f 20 66 6f 72  |.......-.two for|
000007e0  20 74 68 65 20 73 68 6f  77 15 01 03 01 2f 01 6f  | the show..../.o|
000007f0  6e 65 20 66 6f 72 20 74  68 65 20 6d 6f 6e 65 79  |ne for the money|

Fire up the SQLCipher application in simulator and look for the application database files under /Users/sjlombardo/Library/Application Support/iPhone Simulator/5.0/Applications/<Instance ID>/Documents. Try running hexdump on the application database. With SQLCipher the output should looks completely random, with no discerning characteristics at all.

% hexdump -C sqlcipher.db
00000000  1b 31 3c e3 aa 71 ae 39  6d 06 f6 21 63 85 a6 ae  |.1<..q.9m..!c...|
00000010  ca 70 91 3e f5 a5 03 e5  b3 32 67 2e 82 18 97 5a  |.p.>.....2g....Z|
00000020  34 d8 65 95 eb 17 10 47  a7 5e 23 20 21 21 d4 d1  |4.e....G.^# !!..|
...
000007d0  af e8 21 ea 0d 4f 44 fe  15 b7 c2 94 7b ee ca 0b  |..!..OD.....{...|
000007e0  29 8b 72 93 1d 21 e9 91  d4 3c 99 fc aa 64 d2 55  |).r..!...<...d.U|
000007f0  d5 e9 3f 91 18 a9 c5 4b  25 cb 84 86 82 0a 08 7f  |..?....K%.......|
00000800

Other sensible testing steps include:

  • Attempt to open a database with a correct key and verify that the operation succeeds
  • Attempt to open a database with an incorrect key and verify that the operation fails
  • Attempt to open a database without any key, and verify the operation fails
  • Programtically inspect the first 16 bytes of the database file and ensure that it contains random data (i.e. not the string SQLite Format 3\0)

来源:https://www.zetetic.net/sqlcipher/ios-tutorial/

Web的十大可疑顶级域名,你知道么?

就像所有城市一样,互联网也有一些频繁发生可疑活动的地区,比如垃圾邮件、网络诈骗、有潜在威胁的软件、恶意软件、僵尸网络、网络钓鱼等。

企业安全公司Blue Coat System定期分析来自1万5千家企业和7500万用户的Web请求,跟踪互联网上的可疑活动。该公司在上个月发布了与恶意网站有所联系的十大顶级域名。

Web的十大可疑顶级域名,你知道么?
主流的顶级域名以前有在过去的几年中数量激增,从.com、.net和.org扩展出了更多种类。新兴的顶级域通常会吸引大量威胁源,因为使用它们进行注册的成本比起著名的顶级域名要低得多。

Blue Coat建议组织采取措施进行防护,比如屏蔽高风险顶级域名,或者在用户连接到托管在这些顶级域名上的网站时发出警告。Blue Coat还建议用户在不确定目标链接的具体地址时将光标移到超链接对象上,查看目标的具体地址。如果使用移动设备,可以通过点击并长按执行相同的操作。以下是十大最可疑的顶级域名:

1 .zip

这份名单的内容变化很快。.zip域名在Blue Coat于九月份发布报告时还高居榜首,但其排位之后大幅下滑。Blue Coat公司恶意软件研究小组负责人克里斯·拉尔森指出,让.zip高居榜首的原因在于它其实仅有一个活跃域nic.zip,ta是Google的预注册页面,会将用户中继到google.com下属的一个页面,其中介绍了他们新的顶级域名。

拉尔森说:“来自.zip的URL的确出现在了我们的流量日志中,根据公司的WebPulse系统记录,每天我们的客户都会发出10亿匿名访问Web的请求。如果你仔细研究,记录中的大多数都是文件名,而不是URL,但它们最终肯定是以某种方式作为URL出现在了某人的浏览器上,并且被判定成了可疑链接。”

大多数请求都是看上去很搞笑的URL,它们并不能解析,因此被标记为可疑。但拉尔森补充称很多客户雇佣的安全公司都发现.zip域名和Cryptowall、MiniDionis和CozyBear等恶意软件家族间存在联系。

2 .review

尽管.zip从第一的位置上跌落,顶级域名.review仍稳坐全网第二大可疑域名。拉尔森解释称这主要是由于它托管的诈骗网站。

“只要看一看域列表,你就会发现前15个都是诈骗网站,其中至少12个都与中国某保健品诈骗网站同属一个家族。.review可能并没有对驱逐坏人们作出任何努力。”

3 .country

顶级域名.country最近已经在Blue Coat公司的排名中获得了第一,但在报告9月份发布时它还位居第三。

“.country并不像是.click、.link和.rock这些顶级域名,为了弄清它究竟托管了多少恶意网站,我开始时查看了公司的日志。我发现所有近期注册的.country域名都是可疑的。因此如果你想在Web网关上完全屏蔽该域名,我不会怪你。如果有心情的话,你还可以屏蔽.click域名,尽管它并没有像.country这么糟糕。”

该顶级域名似乎已经完全成为了以有奖游戏/调查为名进行钓鱼的诈骗网站殖民地。拉尔森提示,Blue Coat没有直接发现任何与此网络相关的恶意软件,但有些它的配套广告网络与可疑软件存在密切联系。

4 .kim

.kim顶级域名在Blue Coat报告中排位第四。但拉尔森提示称.kim和.xyz(并不属于排名前十)的域名注册商都已经联系了Blue Coat公司,以消除他们顶级域名下的一些可疑活动。

“我们在最近的流量中发现了改变。他们做得更好了,这理应得到称赞。”

该顶级域名确实托管了一些合法的域,最著名的是韩国的某科技博客和土耳其的几家网站(Kim在土耳其语里是“谁”的意思)。但该域名与可疑软件和诈骗网站间存在联系,而且至少有一个域上托管了域名生成算法,该算法能够生成可被恶意软件利用的域名。因此,.kim理应榜上有名。

5 .cricket

.cricket取名自世界上第二大流行的运动:板球。该顶级域名被列为全网第五大可疑顶级域名。

拉尔森指出,尽管它也托管了一些合法网站,但其中存在大量搜索引擎毒化的实例。例如,StarWarsMovie.cricket从其它地方拉来了大量星球大战相关周边的图片,以获取流量,其中有些图片显然就是从其它地方盗取的。如果在页面上点击,将跳转到销售蓝光《星球大战第六部:绝地归来》的网站。

6 .science

第六大可疑顶级域名很大程度上成了其营销策略的牺牲品。为了提升顶级域名的名气,域名注册商曾免费开放.science域的注册。

“他们以低价倾销,基本可以肯定会遇上麻烦。如果花一块钱就能注册一个域名,坏人将蜂拥而至。”

拉尔森说,相比可疑软件和诈骗,.science域和sao’rao的关系最紧密。他指出,可疑活动包括一个大型电子书网站,它的下载页面曾存在可疑软件活动。另一个网站则销售定制的学术论文。

7 .work

顶级域名.work看上去和骚扰及诈骗离得更近,离恶意软件比较远。然而拉尔森的小组找到了一些指向可疑软件分发网络的尝试性链接。拉尔森指出,虽然存在一些合法网站,它仍旧值得屏蔽。举例而言,它托管了一家土耳其色情网站和巴基斯坦的一家视频剪辑网站,这两个网站极其相似。

8 .party

.party位列第八。这里的很多网站乍一看都是合法的。比如排名第一位的FashionOnly.party,页面上展示了女性婚纱礼服和休闲服装。

拉尔森说:“有一些小黄旗,这些图片都有点烂,所有都像是从原格式转换出来的。很多照片的背景中都有其他网站的水印。这是一个没有意义的网站。在评论中也没有任何内容”

这些都是搜索引擎毒化的标志。该顶级域名还托管了一大堆MP3网站,它们有可能是盗版或者恶意软件传播平台。另有一家网站托管了可疑的Tracker。

9 .gq

.gq是赤道几内亚的国家代码。Blue Coat的报告公布以来,.gq已经滑出前10位。但拉尔森指出,它在许多方面能够获得终身成就奖。

“如果翻看数据库中所有与.gq相关的评分,超过7500条的的评价中有99%是可疑的。”

Blue Coat报告中称,大多数对.gq的滥用都属于搜索引擎毒化,一大部分作为Cookie截取器的可疑视频都和恶意软件相关。它还托管了一些自称“震撼视频”的骚扰/诈骗网站,以及少量的其它恶意软件、钓鱼和色情网站。

10 .link

.link是Blue Coat名单的最后一位。该顶级域名充斥着色情内容分发网络和盗版网站,但这都不是Blue Coat标记为可疑的对象。有一家日本网站专门提供关于橄榄球的体育内容,另一家网站则转发美国一些广播电台的新闻内容。但在这些合法域之外还存在很多诈骗网站。

“根据历史来看,这是一个滋生骚扰网站的顶级域。”拉尔森说。

人名与术语

克里斯·拉尔森(Chris Larsen)

顶级域名(Top Level Domain,TLD)

域名生成算法(Domain Generation Algorithm,DGA)

搜索引擎毒化(Search Engine Poisoning)

本文业界资讯相关术语:网络安全论文 网络安全密钥 网络安全工程师 网络安全技术与应用 网络安全概念股 网络安全知识 网络安全宣传周 网络安全知识竞赛 网络安全事件

Json Web Token 详解 [转]

Understanding JWT

JSON Web Tokens (JWT) are a standard way of representing security claims between the add-on and the Atlassian host product. A JWT token is simply a signed JSON object which contains information which enables the receiver to authenticate the sender of the request.

Table of contents

Structure of a JWT token

A JWT token looks like this:

eyJhbGciOiJIUzI1NiIsInR5cCI6IkpXVCJ9.eyJleHAiOjEzODY4OTkxMzEsImlzcyI6ImppcmE6MTU0ODk1OTUiLCJxc2giOiI4MDYzZmY0Y2ExZTQxZGY3YmM5MGM4YWI2ZDBmNjIwN2Q0OTFjZjZkYWQ3YzY2ZWE3OTdiNDYxNGI3MTkyMmU5IiwiaWF0IjoxMzg2ODk4OTUxfQ.uKqU9dTB6gKwG6jQCuXYAiMNdfNRw98Hw_IWuA5MaMo

Once you understand the format, it’s actually pretty simple:

<base64url-encoded header>.<base64url-encoded claims>.<base64url-encoded signature>

In other words:

  • You create a header object, with the JSON format. Then you encode it in base64url
  • You create a claims object, with the JSON format. Then you encode it in base64url
  • You create a signature for the URI (we’ll get into that later). Then you encode it in base64url
  • You concatenate the three items, with the “.” separator

You shouldn’t actually have to do this manually, as there are libraries available in most languages, as we describe in the JWT libraries section. However it is important you understand the fields in the JSON header and claims objects described in the next sections:

Header

The header object declares the type of the encoded object and the algorithm used for the cryptographic signature. Atlassian Connect always uses the same values for these. The typ property will be “JWT” and the alg property will be “HS256”.

{
“typ”:”JWT”,
“alg”:”HS256″
}
Attribute Type Description
“typ” String Type for the token, defaulted to “JWT”. Specifies that this is a JWT token
“alg” (mandatory) String Algorithm. specifies the algorithm used to sign the token. In atlassian-connect version 1.0 we support the HMAC SHA-256 algorithm, which the JWT specificationidentifies using the string “HS256”.

Important

Your JWT library or implementation should discard any tokens which specify alg: none as this can provide a bypass of the token verification.

Claims

The claims object contains security information about the message you’re transmitting. The attributes of this object provide information to ensure the authenticity of the claim. The information includes the issuer, when the token was issued, when the token will expire, and other contextual information, described below.

{
“iss”: “jira:1314039”,
“iat”: 1300819370,
“exp”: 1300819380,
“qsh”: “8063ff4ca1e41df7bc90c8ab6d0f6207d491cf6dad7c66ea797b4614b71922e9”,
“sub”: “batman”,
“context”: {
“user”: {
“userKey”: “batman”,
“username”: “bwayne”,
“displayName”: “Bruce Wayne”
}
}
}
Attribute Type Description
iss(mandatory) String the issuer of the claim. Connect uses it to identify the application making the call. for example:

  • If the Atlassian product is the calling application: contains the unique identifier of the tenant. This is the clientKey that you receive in theinstalled callback. You should reject unrecognised issuers.
  • If the add-on is the calling application: the add-on key specified in the add-on descriptor
iat(mandatory) Long Issued-at time. Contains the UTC Unix time at which this token was issued. There are no hard requirements around this claim but it does not make sense for it to be significantly in the future. Also, significantly old issued-at times may indicate the replay of suspiciously old tokens.
exp(mandatory) Long Expiration time. It contains the UTC Unix time after which you should no longer accept this token. It should be after the issued-at time.
qsh(mandatory) String query string hash. A custom Atlassian claim that prevents URL tampering.
sub(optional) String The subject of this token. This is the user associated with the relevant action, and may not be present if there is no logged in user.
aud(optional) String or String[] The audience(s) of this token. For REST API calls from an add-on to a product, the audience claim can be used to disambiguate the intended recipients. This attribute is not used for JIRA and Confluence at the moment, but will become mandatory when making REST calls from an add-on to e.g. the bitbucket.org domain.
context(optional) Object The context claim is an extension added by Atlassian Connect which may contain useful context for outbound requests (from the product to your add-on). The current user (the same user in the sub claim) is added to the context. This contains the userKey, username and display name for the subject.

"context": {
    "user": {
        "userKey": "batman",
        "username": "bwayne",
        "displayName": "Bruce Wayne"
    }
}
  • userKey — the primary key of the user. Anytime you want to store a reference to a user in long term storage (eg a database or index) you should use the key because it can never change. The user key should never be displayed to the user as it may be a non human readable value.
  • username — a unique secondary key, but should not be stored in long-term storage because it can change over time. This is the value that the user logs into the application with, and may be displayed to the user.
  • displayName — the user’s name.

You should use a little leeway when processing time-based claims, as clocks may drift apart. The JWT specification suggests no more than a few minutes. Judicious use of the time-based claims allows for replays within a limited window. This can be useful when all or part of a page is refreshed or when it is valid for a user to repeatedly perform identical actions (e.g. clicking the same button).

Signature

The signature of the token is a combination of a hashing algorithm combined with the header and claims sections of the token. This provides a way to verify that the claims and headers haven’t been been compromised during transmission. The signature will also detect if a different secret is used for signing. In the JWT spec, there are multiple algorithms you can use to create the signature, but Atlassian Connect uses the HMAC SHA-256 algorithm. If the JWT token has no specified algorithm, you should discard that token as they’re not able to be signature verified.

JWT libraries

Most modern languages have JWT libraries available. We recommend you use one of these libraries (or other JWT-compatible libraries) before trying to hand-craft the JWT token.

Language Library
Java atlassian-jwt and jsontoken
Python pyjwt
Node.js node-jwt-simple
Ruby ruby-jwt
PHP firebase php-jwt and luciferous jwt
.NET jwt
Haskell haskell-jwt

The JWT decoder is a handy web based decoder for Atlassian Connect JWT tokens.

Creating a JWT token

Here is an example of creating a JWT token, in Java, using atlassian-jwt and nimbus-jwt (last tested with atlassian-jwt version 1.5.3 and nimbus-jwt version 2.16):

import java.io.UnsupportedEncodingException;
import java.security.NoSuchAlgorithmException;
import java.util.HashMap;
import com.atlassian.jwt.*;
import com.atlassian.jwt.core.writer.*;
import com.atlassian.jwt.httpclient.CanonicalHttpUriRequest;
import com.atlassian.jwt.writer.JwtJsonBuilder;
import com.atlassian.jwt.writer.JwtWriterFactory;public class JWTSample {

public String createUriWithJwt()
throws UnsupportedEncodingException, NoSuchAlgorithmException {
long issuedAt = System.currentTimeMillis() / 1000L;
long expiresAt = issuedAt + 180L;
String key = “atlassian-connect-addon”; //the key from the add-on descriptor
String sharedSecret = “…”;    //the sharedsecret key received
//during the add-on installation handshake
String method = “GET”;
String baseUrl = “https://<my-dev-environment>.atlassian.net/”;
String contextPath = “/”;
String apiPath = “/rest/api/latest/serverInfo”;

JwtJsonBuilder jwtBuilder = new JsonSmartJwtJsonBuilder()
.issuedAt(issuedAt)
.expirationTime(expiresAt)
.issuer(key);

CanonicalHttpUriRequest canonical = new CanonicalHttpUriRequest(method,
apiPath, contextPath, new HashMap());
JwtClaimsBuilder.appendHttpRequestClaims(jwtBuilder, canonical);

JwtWriterFactory jwtWriterFactory = new NimbusJwtWriterFactory();
String jwtbuilt = jwtBuilder.build();
String jwtToken = jwtWriterFactory.macSigningWriter(SigningAlgorithm.HS256,
sharedSecret).jsonToJwt(jwtbuilt);

String apiUrl = baseUrl + apiPath + “?jwt=” + jwtToken;
return apiUrl;
}
}

Decoding and verifying a JWT token

Here is a minimal example of decoding and verifying a JWT token, in Java, using atlassian-jwt and nimbus-jwt (last tested with atlassian-jwt version 1.5.3 and nimbus-jwt version 2.16).

NOTE: This example does not include any error handling. See AbstractJwtAuthenticator from atlassian-jwt for recommendations of how to handle the different error cases.

import com.atlassian.jwt.*;
import com.atlassian.jwt.core.http.JavaxJwtRequestExtractor;
import com.atlassian.jwt.core.reader.*;
import com.atlassian.jwt.exception.*;
import com.atlassian.jwt.reader.*;
import javax.servlet.http.HttpServletRequest;
import java.io.UnsupportedEncodingException;
import java.security.NoSuchAlgorithmException;
import java.util.Map;

public class JWTVerificationSample {

public Jwt verifyRequest(HttpServletRequest request,
JwtIssuerValidator issuerValidator,
JwtIssuerSharedSecretService issuerSharedSecretService)
throws UnsupportedEncodingException, NoSuchAlgorithmException,
JwtVerificationException, JwtIssuerLacksSharedSecretException,
JwtUnknownIssuerException, JwtParseException {
JwtReaderFactory jwtReaderFactory = new NimbusJwtReaderFactory(
issuerValidator, issuerSharedSecretService);
JavaxJwtRequestExtractor jwtRequestExtractor = new JavaxJwtRequestExtractor();
CanonicalHttpRequest canonicalHttpRequest
= jwtRequestExtractor.getCanonicalHttpRequest(request);
Map requiredClaims = JwtClaimVerifiersBuilder.build(canonicalHttpRequest);
String jwt = jwtRequestExtractor.extractJwt(request);
return jwtReaderFactory.getReader(jwt).readAndVerify(jwt, requiredClaims);
}
}

Decoding a JWT token

Decoding the JWT token reverses the steps followed during the creation of the token, to extract the header, claims and signature. Here is an example in Java:

String jwtToken = …;//e.g. extracted from the request
String[] base64UrlEncodedSegments = jwtToken.split(‘.’);
String base64UrlEncodedHeader = base64UrlEncodedSegments[0];
String base64UrlEncodedClaims = base64UrlEncodedSegments[1];
String signature = base64UrlEncodedSegments[2];
String header = base64Urldecode(base64UrlEncodedHeader);
String claims = base64Urldecode(base64UrlEncodedClaims);

This gives us the following:

Header:

{
“alg”: “HS256”,
“typ”: “JWT”
}

Claims:

 {
“iss”: “jira:15489595”,
“iat”: 1386898951,
“qsh”: “8063ff4ca1e41df7bc90c8ab6d0f6207d491cf6dad7c66ea797b4614b71922e9”,
“exp”:
}

Signature:

uKqU9dTB6gKwG6jQCuXYAiMNdfNRw98Hw_IWuA5MaMo

Verifying a JWT token

JWT libraries typically provide methods to be able to verify a received JWT token. Here is an example using nimbus-jose-jwt and json-smart:

import com.nimbusds.jose.JOSEException;
import com.nimbusds.jose.JWSObject;
import com.nimbusds.jose.JWSVerifier;
import com.nimbusds.jwt.JWTClaimsSet;
import net.minidev.json.JSONObject;public JWTClaimsSet read(String jwt, JWSVerifier verifier) throws ParseException, JOSEException
{
JWSObject jwsObject = JWSObject.parse(jwt);

if (!jwsObject.verify(verifier))
{
throw new IllegalArgumentException(“Fraudulent JWT token: ” + jwt);
}

JSONObject jsonPayload = jwsObject.getPayload().toJSONObject();
return JWTClaimsSet.parse(jsonPayload);
}

Creating a query string hash

A query string hash is a signed canonical request for the URI of the API you want to call.

1
qsh = `sign(canonical-request)`
2
canonical-request = `canonical-method + '&' + canonical-URI + '&' + canonical-query-string`

A canonical request is a normalised representation of the URI. Here is an example. For the following URL, assuming you want to do a “GET” operation:

"https://<my-dev-environment>.atlassian.net/path/to/service?zee_last=param&repeated=parameter 1&first=param&repeated=parameter 2"

The canonical request is

"GET&/path/to/service&first=param&repeated=parameter%201,parameter%202&zee_last=param"

To create a query string hash, follow the detailed instructions below:

  1. Compute canonical method
    • Simply the upper-case of the method name (e.g. "GET" or "PUT")
  2. Append the character '&'
  3. Compute canonical URI
    • Discard the protocol, server, port, context path and query parameters from the full URL.
      • For requests targeting add-ons discard the baseUrl in the add-on descriptor.
    • Removing the context path allows a reverse proxy to redirect incoming requests for"jira.example.com/getsomething" to "example.com/jira/getsomething" without breaking authentication. The requester cannot know that the reverse proxy will prepend the context path"/jira" to the originally requested path "/getsomething"
    • Empty-string is not permitted; use "/" instead.
    • Url-encode any '&' characters in the path.
    • Do not suffix with a '/' character unless it is the only character. e.g.
      • Canonical URI of "https://example.atlassian.net/wiki/some/path/?param=value" is"/some/path"
      • Canonical URI of "https://example.atlassian.net" is "/"
  4. Append the character '&'
  5. Compute canonical query string
    • The query string will use percent-encoding.
    • Sort the query parameters primarily by their percent-encoded names and secondarily by their percent-encoded values.
    • Sorting is by codepoint: sort(["a", "A", "b", "B"]) => ["A", "B", "a", "b"]
    • For each parameter append its percent-encoded name, the '=' character and then its percent-encoded value.
    • In the case of repeated parameters append the ',' character and subsequent percent-encoded values.
    • Ignore the jwt parameter, if present.
    • Some particular values to be aware of:
      • A whitespace character is encoded as "%20",
      • "+" as "%2B",
      • "*" as "%2A" and
      • "~" as "~".
        (These values used for consistency with OAuth1.)
  6. Convert the canonical request string to bytes
    • The encoding used to represent characters as bytes is UTF-8
  7. Hash the canonical request bytes using the SHA-256 algorithm
    • e.g. The SHA-256 hash of "foo" is `”2c26b46b68ffc68ff99b453c1d30413413422d706483bfa0f98a5e886266e7ae

Advanced: Creating a JWT token manually

Disclaimer

You should only need to read this section if you are planning to create JWT tokens manually, i.e. if you are not using one of the libraries listed in the previous section

More details on JWT tokens

The format of a JWT token is simple: <base64url-encoded header>.<base64url-encoded claims>.<signature>.

  • Each section is separated from the others by a period character (.).
  • Each section is base64url encoded, so you will need to decode each one to make them human-readable. Note that encoding with base64 and not base64url will result in an incorrect JWT token for payloads with non UTF-8 characters.
  • The header specifies a very small amount of information that the receiver needs in order to parse and verify the JWT token.
    • All JWT token headers state that the type is “JWT”.
    • The algorithm used to sign the JWT token is needed so that the receiver can verify the signature.
  • The claims are a list of assertions that the issuer is making: each says that “this named field” has “this value”.
    • Some, like the “iss” claim, which identifies the issuer of this JWT token, have standard names and uses.
    • Others are custom claims. We limit our use of custom claims as much as possible, for ease of implementation.
  • The signature is computed by using an algorithm such as HMAC SHA-256 plus the header and claims sections.
    • The receiver verifies that the signature must have been computed using the genuine JWT header and claims sections, the indicated algorithm and a previously established secret.
    • An attacker tampering with the header or claims will cause signature verification to fail.
    • An attacker signing with a different secret will cause signature verification to fail.
    • There are various algorithm choices legal in the JWT spec. In atlassian-connect version 1.0 we support HMAC SHA-256. Important: your implementation should discard any JWT tokens which specify alg: none as these are not subject to signature verification.

Steps to Follow

  1. Create a header JSON object
  2. Convert the header JSON object to a UTF-8 encoded string and base64url encode it. That gives you encodedHeader.
  3. Create a claims JSON object, including a query string hash
  4. Convert the claims JSON object to a UTF-8 encoded string and base64url encode it. That gives you encodedClaims.
  5. Concatenate the encoded header, a period character (.) and the encoded claims set. That gives you signingInput = encodedHeader+ “.” + encodedClaims.
  6. Compute the signature of signingInput using the JWT or cryptographic library of your choice. Then base64url encode it. That gives you encodedSignature.
  7. concatenate the signing input, another period character and the signature, which gives you the JWT token. jwtToken = signingInput + “.” + encodedSignature

Example

Here is an example in Java using gson, commons-codec, and the Java security and crypto libraries:

public class JwtClaims {
protected String iss;
protected long iat;
protected long exp;
protected String qsh;
protected String sub;
// + getters/setters/constructors
}
[…]
public class JwtHeader {
protected String alg;
protected String typ;
// + getters/setters/constructors
}
[…]
import static org.apache.commons.codec.binary.Base64.encodeBase64URLSafeString;
import static org.apache.commons.codec.binary.Hex.encodeHexString;
import java.io.UnsupportedEncodingException;
import java.security.*;
import javax.crypto.*;
import javax.crypto.spec.SecretKeySpec;
import com.google.gson.Gson;
public class JwtBuilder {
public static String generateJWTToken(String requestUrl, String canonicalUrl,
String key, String sharedSecret)
throws NoSuchAlgorithmException, UnsupportedEncodingException,
InvalidKeyException {
JwtClaims claims = new JwtClaims();
claims.setIss(key);
claims.setIat(System.currentTimeMillis() / 1000L);
claims.setExp(claims.getIat() + 180L);
claims.setQsh(getQueryStringHash(canonicalUrl));
String jwtToken = sign(claims, sharedSecret);
return jwtToken;
}
private static String sign(JwtClaims claims, String sharedSecret)
throws InvalidKeyException, NoSuchAlgorithmException {
String signingInput = getSigningInput(claims, sharedSecret);
String signed256 = signHmac256(signingInput, sharedSecret);
return signingInput + “.” + signed256;
}
private static String getSigningInput(JwtClaims claims, String sharedSecret)
throws InvalidKeyException, NoSuchAlgorithmException {
JwtHeader header = new JwtHeader();
header.alg = “HS256”;
header.typ = “JWT”;
Gson gson = new Gson();
String headerJsonString = gson.toJson(header);
String claimsJsonString = gson.toJson(claims);
String signingInput = encodeBase64URLSafeString(headerJsonString
.getBytes())
+ “.”
+ encodeBase64URLSafeString(claimsJsonString.getBytes());
return signingInput;
}
private static String signHmac256(String signingInput, String sharedSecret)
throws NoSuchAlgorithmException, InvalidKeyException {
SecretKey key = new SecretKeySpec(sharedSecret.getBytes(), “HmacSHA256”);
Mac mac = Mac.getInstance(“HmacSHA256”);
mac.init(key);
return encodeBase64URLSafeString(mac.doFinal(signingInput.getBytes()));
}
private static String getQueryStringHash(String canonicalUrl)
throws NoSuchAlgorithmException,UnsupportedEncodingException {
MessageDigest md = MessageDigest.getInstance(“SHA-256”);
md.update(canonicalUrl.getBytes(“UTF-8”));
byte[] digest = md.digest();
return encodeHexString(digest);
}
}
[…]
public class Sample {
public String getUrlSample() throws Exception {
String requestUrl =
“https://<my-dev-environment>.atlassian.net/rest/atlassian-connect/latest/license”;
String canonicalUrl = “GET&/rest/atlassian-connect/latest/license&”;
String key = “…”;     //from the add-on descriptor
//and received during installation handshake
String sharedSecret = “…”; //received during installation Handshake
String jwtToken = JwtBuilder.generateJWTToken(
requestUrl, canonicalUrl, key, sharedSecret);
String restAPIUrl = requestUrl + “?jwt=” + jwtToken;
return restAPIUrl;
}
}

打造你的php安全程序第一步:禁止掉不安全的php函数(php.ini)

为了使php程序更安全,很多站长都选择了禁用一些比较敏感的函数,那影响php安全的函数到底有哪些呢,下面我们列出了一些:
1、phpinfo()
功能描述:输出 PHP 环境信息以及相关的模块、WEB 环境等信息。
危险等级:中
2、passthru()
功能描述:允许执行一个外部程序并回显输出,类似于 exec()。
危险等级:高
3、exec()
功能描述:允许执行一个外部程序(如 UNIX Shell 或 CMD 命令等)。
危险等级:高
4、system()
功能描述:允许执行一个外部程序并回显输出,类似于 passthru()。
危险等级:高
5、chroot()
功能描述:可改变当前 PHP 进程的工作根目录,仅当系统支持 CLI 模式
PHP 时才能工作,且该函数不适用于 Windows 系统。
危险等级:高
6、scandir()
功能描述:列出指定路径中的文件和目录。
危险等级:中
7、chgrp()
功能描述:改变文件或目录所属的用户组。
危险等级:高
8、chown()
功能描述:改变文件或目录的所有者。
危险等级:高
9、shell_exec()
功能描述:通过 Shell 执行命令,并将执行结果作为字符串返回。
危险等级:高
10、proc_open()
功能描述:执行一个命令并打开文件指针用于读取以及写入。
危险等级:高
11、proc_get_status()
功能描述:获取使用 proc_open() 所打开进程的信息。
危险等级:高
12、error_log()
功能描述:将错误信息发送到指定位置(文件)。
安全备注:在某些版本的 PHP 中,可使用 error_log() 绕过 PHP safe mode,
执行任意命令。
危险等级:低
13、ini_alter()
功能描述:是 ini_set() 函数的一个别名函数,功能与 ini_set() 相同。
具体参见 ini_set()。
危险等级:高
14、ini_set()
功能描述:可用于修改、设置 PHP 环境配置参数。
危险等级:高
15、ini_restore()
功能描述:可用于恢复 PHP 环境配置参数到其初始值。
危险等级:高
16、dl()
功能描述:在 PHP 进行运行过程当中(而非启动时)加载一个 PHP 外部模块。
危险等级:高
17、pfsockopen()
功能描述:建立一个 Internet 或 UNIX 域的 socket 持久连接。
危险等级:高
18、syslog()
功能描述:可调用 UNIX 系统的系统层 syslog() 函数。
危险等级:中
19、readlink()
功能描述:返回符号连接指向的目标文件内容。
危险等级:中
20、symlink()
功能描述:在 UNIX 系统中建立一个符号链接。
危险等级:高
21、popen()
功能描述:可通过 popen() 的参数传递一条命令,并对 popen() 所打开的文件进行执行。
危险等级:高
22、stream_socket_server()
功能描述:建立一个 Internet 或 UNIX 服务器连接。
危险等级:中
23、putenv()
功能描述:用于在 PHP 运行时改变系统字符集环境。在低于 5.2.6 版本的 PHP 中,可利用该函数
修改系统字符集环境后,利用 sendmail 指令发送特殊参数执行系统 SHELL 命令。
危险等级:高

禁用方法如下:
打开/etc/php.ini文件,
查找到 disable_functions ,添加需禁用的函数名,如下:
phpinfo,eval,passthru,exec,system,chroot,scandir,chgrp,chown,shell_exec,proc_open,proc_get_status

看过这些函数,站长们应该去检查一下自己的php.ini 看看这些函数是否禁用了。

当然禁止了这些可能会引起安全因素的php函数。你还必须在php.ini里,进一步把php的错误给关闭,这样才更加有针对性的排除你的php被别人利用错误信息进行攻击。
在php.ini里把
display_error = On
改为:
display_error = Off 即可;

高富帅们的Git技巧

Git是一个分布式版本控制系统,拥有许多神奇而易用的特性(比如:分支),这让它可以轻松适应各种工作流程。这篇文章不涉及Git的基本使用,而是介绍了一些高级却有用的小技巧。让我们一起来看看高富帅们的Git技巧,准备好逆袭吧!

以“块”形式暂存你的改动

你肯定已经很熟悉的使用git add命令来将改动暂存到暂存区(staging area)了。你可能也会偶然因为两个不同的原因而做了一次改动,却没有分别提交(仅仅提交了一次),所以,当你执行git log时,会看到诸如这样的提交信息:“修改X,改动无关的Y”。如果这看起来像是你的工作方式,交互式add将是你的有力工具。

交互式add(或者叫add块),将会一个块一个快的循环你的改动。使用命令git add -p时,你可以在每个改动“块”(即:连续的改动会被组织到一起)时进行一些选择,比如:切分当前块为更小的块、跳过一个改动块、甚至手动的编辑该块,你 可以敲入?来查看所有该命令提供的选项。

开始以“块”形式暂存改动简单到只需一条命令(括号部分替换为特定文件):

git add -p (path/file)

译者注:感觉这条命令平常用的较少,我遇到需要分别提交的情况时,都是手动来add然后提交,该命令是这种方法的高级版本。我们平常可能对提交历史的重视比较低,常常出现一些无用的、无意义的提交信息,可以试试这条命令。

切换到最后所在分支

作为一个善良的码农,当你需要快速做些修正或是清理工作时,你都应该花些时间来对待。如果你的工作流程是十分依赖分支的话(译者注:强烈建议如 此),你可能不希望无关的修正影响到现在正在进行功能开发的分支。这意味着,你应该使用git stash命令来暂时存放你的改动,然后切到master分支(译者注:或是其它啥分支,我一般是取名为fix),在那个分支进行修正。(译者注:修正完 了,可以切回正在进行功能开发的分支,执行git stash pop来弹出之前暂存的改动,继续进行开发)。在不同分支间切换很乏味,幸好这里有个快捷命令可以切换到你最后所在的分支:

git checkout -

这个语法对于使用linux的高富帅们来说一定不陌生,cd命令有个类似的缩写cd -,表示切换到你最后所在的目录。当你需要切回功能开发分支时,你根本不用关心那个分支是啥名,只需git checkout -。

译者注:感觉tab键的自动补全也挺好用的,不过这条命令可以少敲点字。有了这条命令,妈妈再也不用担心我的分支切换了。

显示哪些分支被合并了(或是哪些没有被合并)

在使用git时,你可能会创建许多分支,导致执行git branch命令列出分支时变得有些杂乱。于是,你想处理那些已经合并到master分支的无用分支,但是,当你执行git checkout -d 来删除分支时可能会遇到“麻烦”(译者注:git会拒绝删除未合并的分支并提示你),如果使用以下命令,你将不再需要三思而后删,可以自信的处理那些已经 合并了的分支。

如果你想要看看你的本地分支里哪些分支是已经合并进你当前所在的分支时,可以使用:

git branch --merged

反过来,如果需要查看哪些分支还没有合并进当前所在的分支,可以使用:

git branch --no-merged

结合高富帅的UNIX工具,你可以轻松的删除那些已经合并了的分支:

git branch --merged | xargs git branch -d

译者注:xargs是UNIX平台的一个工具,它的作用是将参数列表转换成小块分段传递给其他命令,以避免参数列表过长的问题。如果git branch –merged显示的是a,b,c三个分支已经合并,上面的命令会转换为:git branch -d a b c。更多xargs的信息:http://zh.wikipedia.org/wiki/Xargs

从另一分支获取文件内容而不用切换分支

设想你正在进行重构,你创建了好几个分支并在各分支下进行改动。这时,你想把另一个分支里某一个文件的改动引入到当前工作的分支里,为了达到目的你 可能需要好几步:git stash你的改动;切换到那个分支;获取文件的改动;切回工作分支(当然是使用git checkout -);继续进行编辑(译者注:别忘了git stash pop)。但是,你也可以直接检出另一分支的文件,并且合并到你当前所在的工作分支,使用命令(括号部分替换为对应的分支和文件):

git checkout (branch) -- (path/file)

以最后提交排序的Git分支

想必你已经使用上面的tip处理了杂乱的分支,有一些是用–merged选项标志来清理的吧。那其它的分支咋办呢?你咋知道哪些是有用的,哪些是 完全过期无用的呢?git for-each-ref命令可以打印出一个列表,该列表显示每个分支最后一次提交的引用(reference)信息。我们可以自定义输出来包含一些有用 的信息,更重要的是我们还可以按日期排序。可以使用下面的命令来输出一个列表,该表将显示按时间先后排序的每个分支的最后提交信息、提交者等信息:

git for-each-ref --sort=-committerdate --format="%(committername)@%(refname:short) [%(committerdate:short)] %(contents)"

还可以把它定义在gitconfig里:

[alias]
  latest = for-each-ref --sort=-committerdate --format=\"%(committername)@%(refname:short) [%(committerdate:short)] %(contents)\"

译者注:定义后就只需执行git latest了。注意双引号需要转义!

在玻璃房内的人们别用git blame

或者说,在玻璃房内的人们不应该直接使用git blame而不带下文的选项标志。(译者注:玻璃房内的人是完全能被别人看到的人。这里的意思应该是想说,你每一次提交的变动都会被记录到git仓库的历 史,对于git仓库来说,你就像是住在玻璃房里的人,没有任何秘密,你根本逃不过git的”责问“)git blame是很有用的命令,它就像使用科学来证明你是正确的!但是请注意,许多文件的变动是很表面的,发现问题的来源需要更多的探索。像是移除空白、移动 内容到新行、移动内容到另一文件等动作都可以使用选项来忽略掉,以便更容易的找到代码变动的始作俑者。

在你blame(责备)他人前,记得用以下命令看看结果:

git blame -w  # 忽略移除空白这类改动
git blame -M  # 忽略移动文本内容这类改动
git blame -C  # 忽略移动文本内容到其它文件这类改动

译者注:git blame用来显示一份文件每一行的最近一次提交的提交hash值和提交者。当你跟别人说“我真的没改过这个文件啊”之前,就得git blame下。

在整个git仓库提交历史中找寻内容(然后删掉它)

你有时可能需要查找一行你写的代码,但是就是无法找到。它可能安放在了一些已经被遗忘的分支,或是删除了很久,又或是就在那显而易见的地方。无论哪种方式,你都可以通过一些命令在整个git仓库的历史中搜寻特定的字符串。

首先,我们需要拿到所有的提交,然后,使用git grep来搜寻特定的字符串。如下:

git rev-list --all | xargs git grep -F '搜寻的字符串'

你可能有一个粗心的朋友不小心在仓库里提交了诸如,用户名、密码、外婆的大蒜食谱等敏感信息。首先,他们得更改用户名、密码(并向外婆道歉)。然 后,你需要搜寻这些得罪人的文件,并将他们从整个仓库的历史里抹去(这听起来好像很容易)。经过这个处理,那些执行git pull的伙计们就会发现所有提交中包含的敏感信息都被清理干净了,而那些没有合并你的远程改动的家伙还是拥有敏感信息(所以,千万别忘记先改用户名和密 码)。我们来看看怎么操作。

首先,重写每个分支的历史,移除敏感信息:

git filter-branch --index-filter 'git rm --cached --ignore-unmatch (filename)' --prune-empty --tag-name-filter cat -- --all

然后,将记录敏感信息的文件增加到.gitignore文件,并提交(括号部分替换为对应文件名):

echo (filename) >> .gitignore
git add .gitignore
git commit -m "Add sensitive (filename) file to gitignore"

接着,由于我们改写了历史,我们需要“强制”的将改动推到远程:

git push origin master --force
# 译者注:还可以使用命令
git push origin +master

最后,这个文件还在你的本地仓库里,还需要将它完全抹除:

rm -rf .git/refs/original/
git reflog expire --expire=now --all
git gc --prune=now
git gc --aggressive --prune=now

你这粗心的朋友从敏感文件的危机中解脱,而你用你高超的git知识成功逆袭,成为了他的英雄!

译者注:一天,妹子叫我去她家帮她把她的三围信息从git仓库的历史里完全删除,我研究了很久不得要领。妹子说,不如我们做点其它的事吧。我觉得我的git知识被她鄙视了,坚定的说,我一定要把它删掉!然后,就没有然后了… …

忽略文件跟踪

在和他人合作时可能常常意味着你需要更改一些配置才能让应用在环境里跑起来,这时,常常会不小心把这些只对你有意义的配置文件也给提交了。为了不再 常常关注这些文件,看着它们在git status时放肆的显示“modified”,你可以告诉git忽略它们的改动。这种方式,可以看成是一种和仓库绑定的gitignore文件(括号部 分替换为对应文件):

  git update-index --assume-unchanged (path/file)

译者注:感觉,.gitignore文件更方便和好理解。

让分支的历史归零

不管出于啥理由,有时从头开始正是你需要的。也许是你接手了一个不确信能安全开源的代码仓库;也许是你要着手做些全新的事情;也许是你想创建用于其 它目的一个新分支,又希望继续在仓库里维护它(比如:github页面,项目的文档一类的东西)。上述的情形下,你可以非常简单的创建一个没有提交历史的 分支(括号部分替换为对应分支):

  git checkout --orphan (branch)

译者注:我们知道,分支只是对提交的一个引用,所以,每当从当前分支创建一个分支时,被创建的分支都会延续之前的历史,但是这种方式却不会,是一个完完全全干净的git分支,没有任何的提交!

你一定离不开的别名

不讨论能节省大量敲击时间的“git别名(git alias)”技巧的git文章一定都是在耍流氓。停止输入冗长的命令,使用超级有用的别名吧!git别名可以加到.gitconfig文件里,或是使用 命令(译者注:本质就是改写.gitconfig命令)来增加(括号部分替换为别名和对应的命令):

    git config --global alias.(name) "(command)"
  1. 在依赖分支的工作流程中,你常常要在不同分支间切换,每次敲击节约你6个字母。
    co = checkout
    
  2. 在提交前瞧瞧你将要提交的都有什么改动是一个好习惯,这可以帮助你发现拼写错误、不小心的提交敏感信息、将代码组织成符合逻辑的组。使用git add暂存你的改动,然后使用git ds查看你将要提交的改动动。
    ds = diff --staged
    
  3. 你可能十分熟悉git输出的详细状态信息了,当到达一定境界时,你可能需要忽略所有那些描述,直击问题的核心。这个别名输出将输出git status的简短形式和分支的详细信息。
    st = status -sb
    
  4. 你是否在提交后才发现忘记git add某个文件了,或是提交了才想再改动些啥?amend(修正)暂存区到最近的一次提交吧。(译者注:这个命令不太好理解,–amend是重写提交历 史,-C是重用某次提交的提交信息。场景是当你提交完了发现还有些改动没提交,又不想写什么“改动了X,再次提交”这种狗血的提交信息。重新git add并git amend后,重用上次的提交信息再次提交,替换上次的不完整提交。特别注意–amend重写了提交,如果你已经push到远程了,慎用这条命令!)
    amend = commit --amend -C HEAD
    
  5. 有时上面的修正可能不好使了,你需要undo(撤销)。undo会回退到上次提交,暂存区也会回退到那次提交时的状态。你可以进行额外的改动,用新的提交信息来再次进行提交。
    undo = reset --soft HEAD^
    
  6. 维护一个多人编辑的代码仓库常常意味着试着发现何人在改动什么,这个别名可以输出提交者和提交日期的log信息。
    ls = log --pretty=format:'%C(yellow)%h %C(blue)%ad %C(red)%d %C(reset)%s %C(green) [%cn]' --decorate --date=short
    
  7. 这个别名用来在一天的开启时回顾你昨天做了啥,或是在早晨刷新你的记忆(括号内替换为自己的email)。
    standup = log --since '1 day ago' --oneline --author (YOUREMAIL)
    
  8. 一个复杂的仓库可能很难用直线式的输出来查看,这个别名可以用图表的形式向你展示提交是怎样及何时被加到当前分支的。
    graph = log --graph --pretty=format:'%C(yellow)%h %C(blue)%d %C(reset)%s %C(white)%an, %ar%C(reset)'
    

译者注:我根据上面的别名进行了一些整理修改,这是我现在的.gitconfig里的别名配置:

[alias]
  st = status -sb
  co = checkout
  br = branch
  mg = merge
  ci = commit
  ds = diff --staged
  dt = difftool
  mt = mergetool
  last = log -1 HEAD
  latest = for-each-ref --sort=-committerdate --format=\"%(committername)@%(refname:short) [%(committerdate:short)] %(contents)\"
  ls = log --pretty=format:\"%C(yellow)%h %C(blue)%ad %C(red)%d %C(reset)%s %C(green)[%cn]\" --decorate --date=short
  hist = log --pretty=format:\"%C(yellow)%h %C(red)%d %C(reset)%s %C(green)[%an] %C(blue)%ad\" --topo-order --graph --date=short
  type = cat-file -t
  dump = cat-file -p

via alimama mux
作者:Chris Kelly 译者:栖邀
英文原文

来源:http://segmentfault.com/a/1190000002448847

服务器的瞬时 Diffie-Hellman 公共密钥过弱

服务器的瞬时 Diffie-Hellman 公共密钥过弱

ERR_SSL_WEAK_SERVER_EPHEMERAL_DH_KEY

该错误会在连接到安全 (HTTPS) 服务器时发生。 这意味着服务器正在尝试建立安全连接, 但由于严重的配置错误,连接会很不安全!

在这种情况下, 服务器需要进行修复。 为了保护您的隐私, “Google Chrome”不会使用不安全的连接。

以前可以跳过,现在不行了

方法:

1.更改服务器加密协议为TSL,chrome 45 版本后不再支持SSL v2 v3了

Firefox 可以使用 禁止dhe,不过不推荐

2.使用更高强度的证书,可以自签,也可使用免费证书(不过都有时间限制)

当然如果不差钱,可以购买一个证书,这样解决问题彻底

黑客公开CSDN网站数据库 600余万用户资料泄密

来源: 站长之家

360安全卫士官方微博发布了一条紧急通知,称CSDN网站600余万用户数据库泄密。

CSDN是Chinese software develop net的缩写,中国软件开发联盟。中国最大的开发者技术社区。它是集新闻、论坛、群组、Blog、文档、下载、读书、Tag、网摘、搜索、.NET、Java、游戏、视频、人才、外包、第二书店、《程序员》等多种项目于一体的大型综合性IT门户网站,它有非常强的专业性,其会员囊括了中国地区百分之九十以上的优秀程序员,在IT技术交流及其周边国内中第一位的网站。

中国经济周刊:塞班从霸主到弃子

来源: 中国经济周刊

中国经济周刊》记者 王辰越︱北京报道

“看着芬兰人将塞班扔进垃圾箱里,我是多么的伤心啊,当初诺基亚收购塞班时候,他们作出了多少承诺啊!”塞班的创立者之一保罗·库克顿无比惆怅地说。

塞班,智能手机系统领域曾经的当之无愧的老大。然而iPhone出现了,塞班的优势似乎只剩下价格了;接着,安卓出现了,塞班的价格优势不见了。塞班似乎成了怀旧者的专属。

微软的头号敌人

塞班公司成立于1998年6月,由当时英国著名手持电脑公司Psion(宝意昂)的软件部门拆分而来,著名手机厂商爱立信、诺基亚、松下、摩托罗拉共同投资建立。

“我们当时想要成立一家新的公司,一家手机公司,这家公司的股东应该是当时最领先的两家手机厂商——爱立信和诺基亚。这就是我当时兴奋的原因。”Paul Cockerton对《中国经济周刊》回忆道。

与此同时,意图染指手机领域的比尔·盖茨,也在不断地向诺基亚当时的CEO欧利拉(Jorma Ollila)示好。

然而在欧利拉的计划中,根本没有微软的位置。欧利拉并不想和PC 领域的硬件厂商一样,只是给微软当苦力。

塞班的出现恰好迎合了欧利拉的计划。于是,欧利拉婉拒了盖茨的好意。

1998年6月24日,塞班成立,愤怒的盖茨写下了那封著名的备忘录:“不管塞班做了什么,对我们都是有害的。”

1999年3月,刚刚成立9个月的塞班公司,推出了Symbian5.0操作系统,它集成了通信网络、无线文字、网页浏览、电子邮件等功能,支持Java应用,能够运行小型的第三方软件,比微软的WindowsCE更易用。同年,塞班公司被美国媒体评为“综合评定最佳”和“最具长期潜力”的公司。

2000年,全球第一款基于塞班操作系统的手机——爱立信R380诞生。此后,索尼、三洋、富士通、索尼爱立信也先后获得了塞班操作系统的许可证。庞大的塞班联盟就此形成,当时全球著名的手机厂商几乎囊括殆尽。2002年左右,搭载塞班系统的智能手机越来越多。

“在接下来的一段时间里,我们越来越让微软讨厌了,越来越多的塞班手机的推出逐渐占领了中低端市场。”保罗·库克顿说。

狂怒的微软也着手开发下一代面向智能手机的系统,盖茨给这个系统起名叫做Stinger,即美军的“毒刺”导弹,用意很明显,这将是一颗击败塞班的“毒刺”。

然而,盖茨的企图再一次落空了。

诺基亚庇护下的塞班帝国

在欧利拉看来,塞班一直都是帮助诺基亚坐上智能手机领域头把交椅的功臣。

塞班公司成立时,诺基亚在持股数量上位于第三。然而在市场规模上,诺基亚却是塞班成员中的带头大哥。

2003年的智能手机系统市场份额中,塞班占有市场份额的66.6%,微软则只有可怜巴巴的22.5%。

2004年2月,诺基亚收购了Psion公司持有的价值大约1.357亿英镑的塞班公司股权,至此,诺基亚持有的塞班公司的股权已经达到了63.3%。

手机业界翘楚诺基亚,市场占有率最高的智能手机系统塞班,双雄联手,风光一时无两。在塞班看来,自己的命运已和诺基亚紧紧联系到了一起。

2005年,全球智能手机领域大势已定。微软的Stinger无疾而终,Windows系列手机系统依然无法撼动诺基亚庇护下的塞班帝国。

2006年,搭载塞班系统的智能手机出货量达到了一亿部,经过八年和微软斗智斗勇的艰苦奋战,诺基亚和塞班似乎隐约看见了未来的辉煌。

然而,天有不测风云。

塞班将死?

2007年初,乔布斯带着iPhone闪亮登场,这个一向自负的天才放话说,“要重新发明手机”。

身居高位的诺基亚,对于这个“做音乐的”不屑一顾。“苹果需要将自己的品牌知名度转化成市场份额,这需要一段时间。”诺基亚当时的CEO这样鼓励自己的员工。而乔布斯当时对塞班也表现得很客气:“诺基亚Symbian系统的签名证书模式,是非常值得借鉴的。”

塞班没有意识到自己的危险处境。

2007年11月5日,谷歌的安卓系统发布。随着安卓在智能手机领域的迅速攻城略地,塞班开始招架不住了。

2008年5月,诺基亚时任CEO康培凯警告说:“传统上,苹果、Google、微软等公司不是我们的竞争对手,但现在,我们必须要应对他们带来的挑战。”同年6月,诺基亚宣布收购塞班公司,使之成为自己的全资子公司。但是,塞班的颓势已无法挽回。搭载iOS系统的iPhone和搭载安卓系统的HTC,逐渐成为消费者的新欢。

虽然瘦死的骆驼比马大,在市场占有率上,塞班仍然是老大,但是人们津津乐道的已经变成了愤怒的小鸟和越做越大的超大电容屏。

安卓和iOS带来的流畅让塞班的缺陷开始逐渐显现。网易手机频道主编骆峰向《中国经济周刊》介绍说:“塞班在编写之初,主要功能着重于打电话时的信号通畅。但对于消费者来说,如今的手机已不仅仅是打电话发短信了,更多的是娱乐。塞班对触摸屏、多媒体、新操作界面的支持都不好,在同PC以及互联网的交互以及应用方面的扩展性上都存在着先天不足,和安卓、苹果一比,相去甚远。”

2010年底,安卓和iOS的市场占有率之和已经超过了50%,超过了塞班,并且这个数字仍然在上升。在下坡路上越走越远的塞班,无奈之下,作出了一个艰难的决定。

2011年2月11日,诺基亚和老对头微软的手握在了一起,诺基亚CEO埃洛普表示,诺基亚将和微软达成广泛的战略合作关系,诺基亚将把微软的WP7系统当做主要系统;同时,决定将塞班的继续开发等各项工作转交给埃森哲公司,诺基亚将不再提供对塞班系统进行更新。

Oracle默认端口清单

服务 端口 产品 更改办法
Oracle HTTP Server listen port / Oracle HTTP Server port 80 Oracle Application Server Edit httpd.conf and restart OHS
Oracle Internet Directory(non-SSL) 389 Oracle Application Server
Oracle HTTP Server SSL port 443 Oracle Application Server Edit httpd.conf and restart OHS
Oracle Internet Directory(SSL) 636 Oracle Application Server
Oracle Net Listener / Enterprise Manager Repository port 1521 Oracle Application Server / Oracle Database Edit listener.ora and restart listener
Oracle Net Listener 1526 Oracle Database Edit listener.ora and restart listener
Oracle Names 1575 Oracle Database Edit names.ora and restart names server
Oracle Connection Manager (CMAN) 1630 Oracle Connection Manager Edit cman.ora and restart Connection Manager
Oracle JDBC for Rdb Thin Server 1701 Oracle Rdb
Oracle Intelligent Agent 1748 Oracle Application Server snmp_rw.ora
Oracle Intelligent Agent 1754 Oracle Application Server snmp_rw.ora
Oracle Intelligent Agent 1808 Oracle Application Server snmp_rw.ora
Oracle Intelligent Agent 1809 Oracle Application Server snmp_rw.ora
Enterprise Manager Servlet port SSL 1810 Oracle Enterprise Manager
Oracle Connection Manager Admin (CMAN) 1830 Oracle Connection Manager (CMAN) Edit cman.ora and restart Connection Manager
Enterprise ManagerAgent port 1831 Oracle Enterprise Manager
Enterprise Manager RMI port 1850 Oracle Enterprise Manager
Oracle XMLDB FTP Port 2100 Oracle Database change dbms_xdb.cfg_update
Oracle GIOP IIOP 2481 Oracle Database Edit listener.ora/init.ora and restart listener/database
Oracle GIOP IIOP for SSL 2482 Oracle Database Edit listener.ora/init.ora and restart listener/database
Oracle OC4J RMI 3201 Oracle Application Server
Oracle OC4J AJP 3301 Oracle Application Server
Enterprise Manager Reporting port 3339 Oracle Application Server Edit oem_webstage/oem.conf and restart OHS
Oracle OC4J IIOP 3401 Oracle Application Server
Oracle OC4J IIOPS1 3501 Oracle Application Server
Oracle OC4J IIOPS2 3601 Oracle Application Server
Oracle OC4J JMS 3701 Oracle Application Server
Oracle9iAS Web Cache Admin port 4000 Oracle Application Server Webcache Admin GUI or webcache.xml
Oracle9iAS Web Cache Invalidation port 4001 Oracle Application Server Webcache Admin GUI or webcache.xml
Oracle9iAS Web Cache Statistics port 4002 Oracle Application Server Webcache Admin GUI or webcache.xml
Oracle Internet Directory(SSL) 4031 Oracle Application Server
Oracle Internet Directory(non-SSL) 4032 Oracle Application Server
OracleAS Certificate Authority (OCA) – Server Authentication 4400 Oracle Application Server
OracleAS Certificate Authority (OCA) – Mutual Authentication 4401 Oracle Application Server
Oracle HTTP Server SSL port 4443 Oracle Application Server Edit httpd.conf and restart OHS
Oracle9iAS Web Cache HTTP Listen(SSL) port 4444 Oracle Application Server Webcache Admin GUI or webcache.xml
Oracle TimesTen 4662 Oracle TimesTen
Oracle TimesTen 4758 Oracle TimesTen
Oracle TimesTen 4759 Oracle TimesTen
Oracle TimesTen 4761 Oracle TimesTen
Oracle TimesTen 4764 Oracle TimesTen
Oracle TimesTen 4766 Oracle TimesTen
Oracle TimesTen 4767 Oracle TimesTen
Oracle Enterprise Manager Web Console 5500 Oracle Enterprise Manager Web
iSQLPlus 10g 5560 Oracle i*SQLPlus
iSQLPlus 10g 5580 Oracle i*SQLPlus RMI Port
Oracle Notification Service request port 6003 Oracle Application Server
Oracle Notification Service local port 6100 Oracle Application Server
Oracle Notification Service remote port 6200 Oracle Application Server
Oracle9iAS Clickstream Collector Agent 6668 Oracle Application Server
Java Object Cache port 7000 Oracle Application Server
DCM Java Object Cache port 7100 Oracle Application Server
Oracle HTTP Server Diagnostic Port 7200 Oracle Application Server
Oracle HTTP Server Port Tunneling 7501 Oracle Application Server
Oracle HTTP Server listen port / Oracle HTTP Server port 7777 Oracle Application Server Edit httpd.conf and restart OHS
Oracle9iAS Web Cache HTTP Listen(non-SSL) port 7779 Oracle Application Server Webcache Admin GUI or webcache.xml
Oracle HTTP Server Jserv port 8007 Oracle Application Server
Oracle XMLDB HTTP port 8080 Oracle Database change dbms_xdb.cfg_update
OC4J Forms / Reports Instance 8888 Oracle Developer Suite
OC4J Forms / Reports Instance 8889 Oracle Developer Suite
Oracle Forms Server 6 / 6i 9000 Oracle Application Server
Oracle SOAP Server 9998 Oracle Application Server
OS Agent 14000 Oracle Application Server
Oracle Times Ten 15000 Oracle Times Ten
Oracle Times Ten 15002 Oracle Times Ten
Oracle Times Ten 15004 Oracle Times Ten
Log Loader 44000 Oracle Enterprise Manager